Android Services

FeaturedAndroid Services

From past few days I have been dwelling in android to make a utility, an application that I can be used when I am reading and article or when I am researching about something.

The premise lies around on the fact that the application itself doesn’t have a screen but what it plays around is on background activity. So it silently keeps on running and when an interrupt comes it performs an action.

Since I am not very well versed with how to make an android of such kind, I searched and found out about the component which does this and it’s called a Service. This is very similar to the concept of linux services or daemons.

The application I am designing is basically a combination of overlay activity and background services. Hence I wouldn’t say that there will be no user interaction at all but it will be really minimal and user doesn’t have a inherent knowledge about the service.

So it was time to do some more reading on android services.

Service is an application component that can perform long-running operations in the background, and it doesn’t provide a user interface. Another application component can start a service, and it continues to run in the background even if the user switches to another application.

Documentation

This was something that I really wanted, now there are a few caveats to this blogpost that is my understanding and knowledge about android application development. So I would tell you take things with a pinch of salt and let me know if there is anything wrong with my understanding.

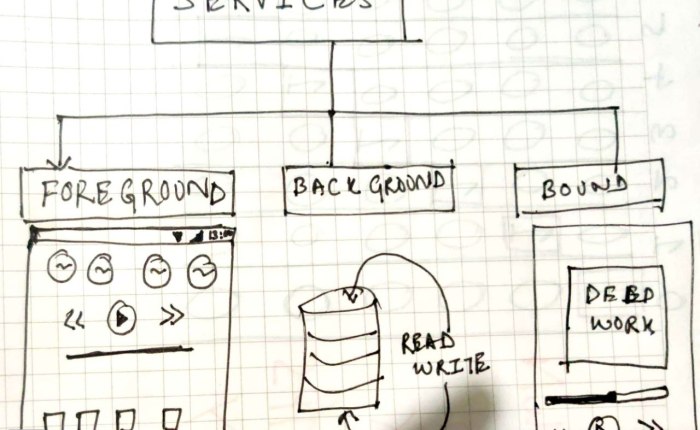
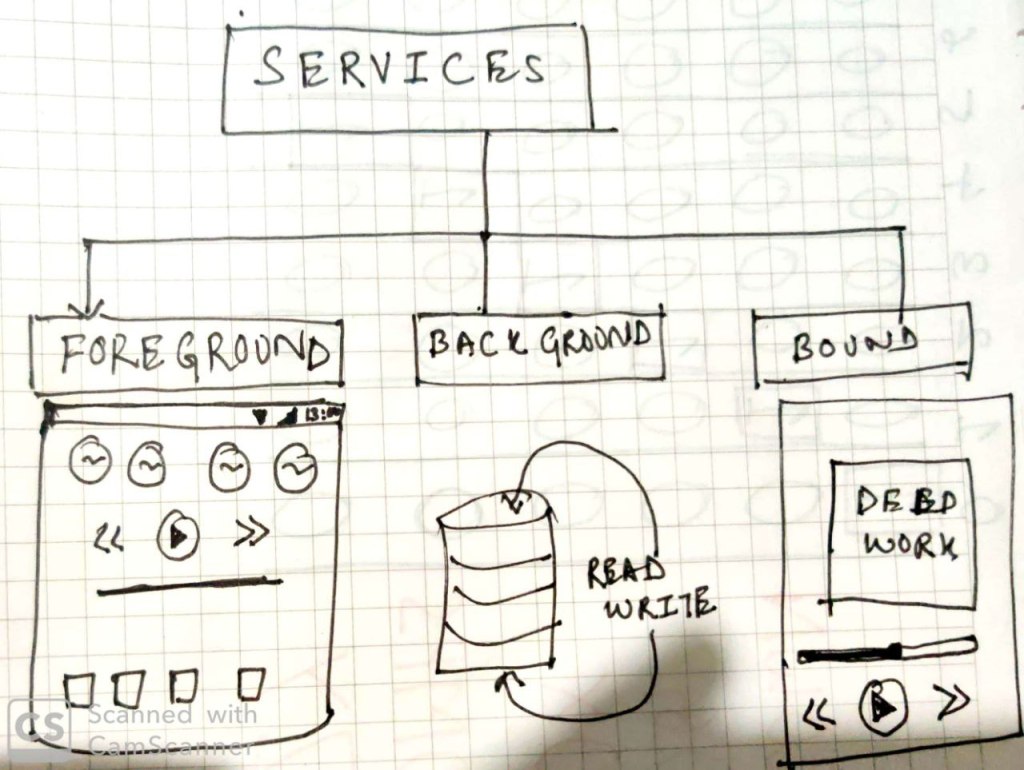
When I read more about services I got to know there are 3 kinds of them:

Foreground

This is how you see spotify music work, even when the application is not in the display you can change songs through notification and there is one level of user interaction involved with this.

Background

Services with which user don’t want to know about or interact, like updating a database, fetching some resources etc.

Bound

Bound services are the one which are attach to the user activity, the quickest example I can give is music player, you don’t want the music to stop when you switch application and in the mean time you want to control the music when you switch back to the application.

Mostly people use services so that all the heavy lifting is done in the background. I had a unique case what I wanted is a service that keeps running and observing, when something is changed or when it is poked then react to it.

If you have seen the design of facebook messenger, the chat heads comes to life only when you have a message, this was somewhat the use case.

The biggest thing that I learnt is android doesn’t allow you run a background service without notifying the user. This is a new addition the happened after Android Oreo.

Implementation

There are two kinds of implementation that android provides,

The former as it’s name suggest is used to spawn service and is attached to the main thread. While IntentSrvice is something more peculiar where you can divide the work and do it without actually make your application wait for something. For example suppose you are playing a game and you are in middle of level 1, now an IntentService can be used to spawn to download and keep all the data required for level 2 without affecting your game play.

Another amazing thing about services is that, it is a singleton, that means however time you are going to start a service, you are not going to interact with too many objects, it’s the same class which you are going to talk to.

Conclusion

These are few of the learning that I got about services in android, I didn’t put much code here because most of them is available in the references. I enjoyed my time learning about how services are designed and how they are manged internally in android. Let me know what you think about it.

Till then, Keep Hacking!

References:

https://www.hellsoft.se/how-to-service-on-android—part-2/

https://proandroiddev.com/deep-dive-into-android-services-4830b8c9a09

https://robertohuertas.com/2019/06/29/android_foreground_services/

https://medium.com/@harunwangereka/android-background-services-b5aac6be3f04

Word Embeddings Simplified

FeaturedWord Embeddings Simplified

Recently I have been dwelling with a lot of NLP problems and jargons. The more I read about it the more I find it intriguing and beautiful of how we humans try to transfer this knowledge of a language to machines.

How much ever we try because of our laid back nature we try to use already existing knowledge or existing materials to be used to make machines understand a given language.

But machines as we know it can only understand digits or lets be more precise binary(0s and 1s). When I first laid my hands on NLP this was my first question, how does a machine understand that something is a word or sentence or a character.

I am still a learner in this field(and life 😝) but what I could understand information that we are going to use has to be converted into binary or some kind of a numerical representation for a machine to understand.

There are various ways to “encode” this information into numerical form and that is what is called word embeddings.

What are word embeddings?

Word embedding is the collective name for a set of language modeling and feature learning techniques in natural language processing (NLP) where words or phrases from the vocabulary are mapped to vectors of real numbers. Conceptually it involves a mathematical embedding from a space with many dimensions per word to a continuous vector space with a much lower dimension.

Wikipedia

In short word embedding is a way to convert a textual information into numerical form so that it can help us analyse it.

Analysis like similarity between words or sentences, understand the context in which a phrase or word is being spoken etc.

How are they formed?

Lets try to convert a given sentence into a numerical form:

A quick brown fox jumps over the lazy dog

How do we convert the above sentence into a numerical form such that our machine or even we can perform operations on it. And its hard to figure out the mathematics of language but we can always try.

So lets try, what we can do is, get all unique words and sort the words in the sentences and then makes a list of them. But then how do we get a numerical representation for it. It’s time for us to visit our long lost friend – Matrix.

Let’s get the words in proper order i.e unique and sorted

Now we will try to convert these words into numerical form using some matrix concepts(mostly representation) so that we can make a word look different from another word.

If you see there are totally 10 words and so we took 10 blocks to represent it. In a more mathematical term each representation is called a vector and the dimension of this vector is 1 x 10. So each word in this universe can be represented by a vector of that dimension and we can now carry operations on it to get our desired result.

Few prominent operations are how similar are two vectors or how different are two vectors. We can dive into that later.

Now the method that we just followed is a very brute force way of doing this and is officially called as One-Hot Encoding or Count Vectorizing.

Why we do this?

Now the way we encoded above words can be really useless because it’s just a representation and it doesn’t have any other idea so we don’t know how two words are related or are they morphologically similar etc.

The prime reason we want to have encoding is to find similar words, gauge the context of the topics etc.

There are various other techniques which actually produce intelligent embeddings that has an idea about what is going on.

As Hunter puts it

When constructing a word embedding space, typically the goal is to capture some sort of relationship in that space, be it meaning, morphology, context, or some other kind of relationship

and a lot of other embeddings like Elmo, USE etc. does a good job at that.

As we go ahead and explore more embeddings you will see it goes on becoming more complex. There are layers of training models introduced etc.

We even have sentence embeddings which are way different from just word embeddings.

Conclusion

This was just a tip of the iceberg or may be not even that but I thought it will be helpful for someone who is starting their exploration because it took time for me to get around this concept. Thanks a lot for reading.

Happy Hacking!

References:

http://hunterheidenreich.com/blog/intro-to-word-embeddings/

https://towardsdatascience.com/word-representation-in-natural-language-processing-part-ii-1aee2094e08a

https://towardsdatascience.com/document-embedding-techniques-fed3e7a6a25d?gi=7c5fcb5695df

File Indexing In Golang

File Indexing In Golang

I have been working on a pet project to write a File Indexer, which is a utility that helps me to search a directory for a given word or phrase.

The motivation behind to build this utility was so that we could search the chat log files for dgplug. We have a lot of online classes and guest sessions and at times, we just remember the name or a phrase used in the class, backtracking the files using these phrases aren’t possible as of now. I thought I will give a stab at this issue and since I am trying to learn golang I used it to implement my solution. It took me a span of two weeks where I spent time to upskill certain aspects and also to come up with a clean solution.

Exploration

This started with me exploring similar solutions, because why not? It is always better to improve an existing solution than to write your own. I didn’t find any which suited our need though so I ended up writing my own. The exploration led me to discover a few  libraries that proved useful. I found fulltext and Bleve.

I found bleve to have better documentation and some really beautiful thought behind the library. Really minimal yet effective. At the end of it all, I was sure I was going to use it.

Working On the Solution

After all the exploration I tried to break the problem into smaller pieces and then go about solving each one of them. So the first one was to understand how bleve worked. I found out that bleve creates an index first; for which we need to give it the list of files. The index is basically a map structure behind the scenes, where you give it the id and content to be indexed. So what could be a unique constraint for a file in a filesystem? The path of the file! I used it as the id to my structure and the content of my file as the value.

After figuring this out, I wrote a function which takes the directory as the argument and gives back the path of each file as well as its contents. After a few iterative. improvements it diverged into two functions; one responsible to get the path of all the files and the other to just read the file and get the content out.

func fileNameContentMap() []FileIndexer {
	var ROOTPATH = config.RootDirectory
	var files []string
	var filesIndex FileIndexer
	var fileIndexer []FileIndexer

	err := filepath.Walk(ROOTPATH, func(path string, info os.FileInfo, err error) error {
		if !info.IsDir() {
			files = append(files, path)
		}
		return nil
	})
	checkerr(err)
	for _, filename := range files {
		content := getContent(filename)
		filesIndex = FileIndexer{Filename: filename, FileContent: content}
		fileIndexer = append(fileIndexer, filesIndex)
	}
	return fileIndexer
}

This forms a struct which stores the name of the file and the content of the file. And since I can have many files I need to have a array of said struct. This is how a simple data structure evolves into a complex one.

Now I have the utility of getting all files, getting content of the file and making an index.

This leads us to the next crucial step.

How Do I Search?

Now that I’ve prepped my data the next logical step was to retrieve the searched results. The way we search something is by passing a query so I duck-typed a function which accepts a string and then went on a spree of documentation look up to find out how do I search in bleve. I found a simple implementation which returns the id of the file which is the path and match score.


 func searchResults(indexFilename string, searchWord string) *bleve.SearchResult {
	index, _ := bleve.Open(indexFilename)
	defer index.Close()
	query := bleve.NewQueryStringQuery(searchWord)
	searchRequest := bleve.NewSearchRequest(query)
	searchResult, _ := index.Search(searchRequest)
	return searchResult
}

This function opens the index and search for the term and returns back the information.

Let’s Serve It

After all that is done I need to have a service which does this on demand so I wrote a simple API server which has two endpoints index and search.  The way mux works is you give the endpoint to the handler and the function to be mapped with it. I had to restructure the code in order to make this work. I faced a really crazy bug which when I narrowed it down, came to a point of a memory leak and yes, it was because I left the file read stream open, so remember when you Open always defer Close.

I used Postman to heavily test it and it was returning good responses. A dummy response looks like this:

 [{"index":"irclogs.bleve","id":"logs/some/hey.txt","score":0.6912244671221862,"sort":["_score"]}]

Missing Parts?

The missing part was I didn’t use any dependency manager which Kushal pointed out to me, so I landed up using dep to do this for me. The next one was one of my favourite  problems of the project and that was how to auto-index a file. Suppose my service is running and I added one more file to the directory, then this file’s content wouldn’t come up in the search because the indexer hasn’t run on it yet. This was a fascinating  problem and I tried to approach it from many different angles. First I thought I would re-run the service every time I add a file but that’s not a graceful solution. Then I thought I would write a cron job which would ping /index at regular intervals and yet again that struck me as inelegant. Finally I wondered if I could detect changes in a file. This led me to explore gin, modd and fresh.

Gin was not very compatible with mux so didn’t use it, modd was really nice but I needed to kill the server to restart it since two services cannot run on a single port and every time I kill that service I kill the modd daemon too so that possibility also got ruled out.

Finally the best solution was fresh although I had to write a custom config file to suit the requirement, this approach still has issues with nested repository indexing which I am thinking how to figure out.

What’s Next?

This project is yet to be containerised and there are missing test cases so I would be working on them, as and when I get time.

I have learnt a lot of new things about the filesystem and how it works, because of this project. This little project also helped me appreciate a lot of golang concepts and made me realise the power of static typing.

If you are interested you are welcome to contribute to file-indexer. Feel free to ping me.

Till then, Happy Hacking!


Template Method Design Pattern

Template Method Design Pattern

This is a continuation of the design pattern series.

I had blogged about Singleton once, when I was using it very frequently. This blog post is about the use of the Template Design Pattern. So let’s discuss the pattern and then we can dive into the code and its implementation and see a couple of use cases.

The Template Method Design Pattern is a actually a pattern to follow when there are a series of steps, which need to be followed in a particular order. Well, the next question that arises is, “Isn’t every program a series of steps that has to be followed in a particular order?”

The answer is Yes!

This pattern diverges when it becomes a series of functions that has to be executed in the given order. As the name suggests it is a Template Method Design pattern, with stress on the word method, because that is what makes it a different ball game all together.

Let’s understand this with an example of Eating in a Buffet. Most of us have follow a set of similar specific steps, when eating at a Buffet. We all go for the starters first, followed by main course and then finally, dessert. (Unless it is Barbeque Nation then it’s starters, starters and starters :))

So this is kind of a template for everyone Starters --> Main course --> Desserts.

Keep in mind that content in each category can be different depending on the person but the order doesn’t change which gives a way to have a template in the code. The primary use of any design pattern is to reduce duplicate code or solve a specific problem. Here this concept solves the problem of code duplication.

The concept of Template Method Design Pattern depends on, or rather  is very tightly coupled with Abstract Classes. Abstract Classes themselves are a template for derived classes to follow but Template Design Pattern takes it one notch higher, where you have a template in a template. Here’s an example of a BuffetHogger class.

from abc import ABC, abstractmethod

class BuffetHogger(ABC):

    @abstractmethod
    def starter_hogging(self):
        pass

    @abstractmethod
    def main_course_hogging(self):
        pass

    @abstractmethod
    def dessert_hogging(self):
        pass

    def template_hogging(self):
        self.starter_hogging()
        self.main_course_hogging()
        self.dessert_hogging()

So if you see here the starter_hogging, main_course_hogging and dessert_hogging are abstract class that means base class has to implement it while template_hogging uses these methods and will be same for all base class.

Let’s have a Farhaan class who is a BuffetHogger and see how it goes.

class Farhaan(BuffetHogger):
    def starter_hogging(self):
        print("Eat Chicken Tikka")
        print("Eat Kalmi Kebab")

    def __call__(self):
        self.template_hogging()

    def main_course_hogging(self):
        print("Eat Biryani")

    def dessert_hogging(self):
        print("Eat Phirni")
Now you can spawn as many  BuffetHogger  classes as you want, and they’ll all have the same way of hogging. That’s how we solve the problem of code duplication
Hope this post inspires you to use this pattern in your code too.
Happy Hacking!

Benchmarking MongoDB in a container

The database layer for an application is one of the most crucial part because believe it or not it effects the performance of your application, now with micro-services getting the attention I was just wondering if having a database container will make a difference.

As we have popularly seen most of the containers used are stateless containers that means that they don’t retain the data they generate but there is a way to have stateful containers and that is by mounting a host volume in the container. Having said this there could be an issue with the latency in the database request, I wanted to measure how much will this latency be and what difference will it make if the installation is done natively verses if the installation is done in a container.

I am going to run a simple benchmarking scheme I will make 200 insert request that is write request keeping all other factors constant and will plot the time taken for these request and see what comes out of it.

I borrowed a quick script to do the same from this blog. The script is simple it just uses pymongo the python MongoDB driver to connect to the database and make 200 entries in a random database.


import time
import pymongo
m = pymongo.MongoClient()

doc = {'a': 1, 'b': 'hat'}

i = 0

while (i < 200):

start = time.time()
m.tests.insertTest.insert(doc, manipulate=False, w=1)
end = time.time()

executionTime = (end - start) * 1000 # Convert to ms

print executionTime

i = i + 1

So I went to install MongoDB natively first I ran the above script twice and took the second result into consideration. Once I did that I plotted the graph with value against the number of request. The first request takes time because it requires to make connection and all the over head and the plot I got looked like this.


Native
MongoDb Native Time taken in ms v/s Number of request

The graph shows that the first request took about 6 ms but the consecutive requests took way lesser time.

Now it was time I try the same to do it in a container so I did a docker pull mongo and then I mounted a local volume in the container and started the container by

docker run --name some-mongo -v /Users/farhaanbukhsh/mongo-bench/db:/data/db -d mongo

This mounts the volume I specified to /data/db in the container then I did a docker cp of the script and installed the dependencies and ran the script again twice so that file creation doesn’t manipulate the time.

To my surprise the first request took about 4ms but subsequent requests took a lot of time.

Containered
MongoDB running in a container(Time in ms v/s Number of Requests)


And when I compared them the time time difference for each write or the latency for each write operation was ​considerable.

MongoDB bench mark
Comparison between Native and Containered MongoDB

I had this thought that there will be difference in time and performance but never thought that it would be this huge, now I am wondering what is the solution to this performance issue, can we reach a point where the containered performance will be as good as native.

Let me know what do you think about it.

Happy Hacking!

Writing Chuck – Joke As A Service

Writing Chuck – Joke As A Service

Recently I really got interested to learn Go, and to be honest I found it to be a beautiful language. I personally feel that it has that performance boost factor from a static language background and easy prototype and get things done philosophy from dynamic language background.

The real inspiration to learn Go was these amazing number of tools written and the ease with which these tools perform although they seem to be quite heavy. One of the good examples is Docker. So I thought I would write some utility for fun, I have been using fortune, this is a Linux utility which gives random quotes from a database. I thought let me write something similar but let me do something with jokes, keeping this mind I was actually searching for what can I do and I landed up on jokes about Chuck Norris or as we say it facts about him. I landed up on chucknorris.io they have an API which can return different jokes about Chuck, and there it was my opportunity to put something up and I chose Go for it.

JSON PARSING

The initial version of the utility which I put together was way simple, it use to make a GET request stream the data in put in the given format and display the joke. But even with this implementation I learnt a lot of things, the most prominent one was how a variable is exported in Go i.e how can it be made available across scope and how to parse a JSON from a received response to store the beneficial information in a variable.

// Chucknorris is the struct used to unmarshal the JSON response from the URL
type Chucknorris struct {
Category []string `json:"category"`
IconURL string `json:"icon_url"`
ID string `json:"id"`
URL string `json:"url"`
Value string `json:"value"`
}
/* getJokes takes the API url as the parameter and fetch jokes from it,
* here we have assumed it to be of ChuckNorris type
*/
//TODO: Remove the dependency on the hardcoded struct
func getJokes(URL string) (string, error) {
req, err := http.NewRequest("GET", URL, nil)
if err != nil {
return "", fmt.Errorf("No request formed %v", err)
}
client := &http.Client{}
resp, err := client.Do(req)
if err != nil {
return "", fmt.Errorf("No response: %v", err)
}
defer resp.Body.Close()
respData, err := ioutil.ReadAll(resp.Body)
if err != nil {
return "", fmt.Errorf("Read error")
}
var joke Chucknorris
if err = json.Unmarshal(respData, &joke); err != nil {
return "", fmt.Errorf("Error in unmarsheling, %v", err)
}
return joke.Value, nil
}
view raw initial.go hosted with ❤ by GitHub

Now the mistake I was doing with the above code is I was declaring the fields of the struct with a small letters this caused a problem because although the value get stored in the struct I can’t use them outside the function I have declared it in. I actually took a while to figure it out and it was really nice to actually learn about this. I actually learnt about how to make a GET request and parse the JSON and use the given values.

Let’s walk through the code, the initial part is a struct and I have few fields inside it, the Category field is a slice of string, which can have as many elements as it receives the interesting part is the way you can specify the key from the received JSON how the value of received JSON is stored in the variable or the field of the struct. You can see the json:"categories" that is the way to do it.

With the rest of the code if you see I am making a GET request to the given URL and if the it returns a response it will be res and if it returns an error it will be handled by err. The key part here is how marshaling and unmarshaling of JSON takes place.

This is basically folding and un-folding JSON once that is done and the values are stored to retrieve the value we just use a dot notation and done. There is one more interesting part if you see we passed &joke which if you have a C background you will realize is passing the memory address, pass by reference, is what you are looking at.

This was working good and I was quite happy with it but there were two problems I faced:

  1. The response use to take a while to return the jokes
  2. It doesn’t work without internet

So I showed it to Sayan and he suggested why not to build a joke caching mechanism this would solve both the problems since jokes will be stored internally on the file system it will take less time to fetch and there is no dependency on the internet except the time you are caching jokes.

So I designed the utility in a way that you can cache as may number of jokes as you want you just have to run chuck --index=10 this will cache 10 jokes for you and will store it in a Database. Then from those jokes a random joke is selected and is shown to you.

I learnt to use flag in go and also how to integrate a sqlite3 database in the utility, the best learning was handling files, so my logic was anytime you are caching you should have a fresh set of jokes so when you cache I completely delete the database and create a new one for the user. To do this I need to check of the Database is already existing and if it is then remove it. I landed up looking for the answer on how to do that in Go, there are a bunch of inbuilt APIs which help you to do that but they were misleading for me. There is os.Stat, os.IsExist and os.IsNotExist. What I understood is os.Stat will give me the status of the file, while the other two can tell me if the file exists or it doesn’t, to my surprise things don’t work like that. The IsExist and IsNotExist are two different error wrapper and guess what not of IsExist is not IsNotExist, good luck wrapping your head around it. I eventually ended up answering this on stackoverflow.

After a few iteration of using it on my own and fixing few bugs the utility is ready except the fact that it is missing test cases which I will soon integrate, but this has helped me learn Go a lot and I have something fun to suggest to people. Well, I am open to contribution and hope you will enjoy this utility as much as I do.

Here is a link to chuck!

Give it a try and till then Happy Hacking and Write in GO! 

Featured Image: https://gopherize.me/

The Open Organization

I was recently going through few of the Farnam Street articles, and I landed on the article on how to read a book, where they basically describe how to read a book;  the fact that there are types of books, and the fact that books can, in the words of Francis Bacon “be gulped, some books chewed and others digested.”

This basically signifies the intensity and the level of awareness to have when you are reading a book. I have gulped lots of books, but The Open Organization is one of those, that I wanted to chew on.

I wanted to learn about how you can build an ecosystem where people are free to voice their opinions, where failure is be worn as a badge of honor for trying. This book filled me with thoughts of how would it be like, if an organization is really an Open Organization.

There are a lots of beautiful anecdotes that I came across, and a lot of values that were given in the book to think on.

The book talks about Purpose and Passion. People specially us Millenials,have been spoiled to an extent that we actually don’t run after money but after a purpose, after a problem. We don’t mind working crazy hours and being paid peanuts, but we do care about people, we care about how are we treated, we care about the problem we are after. One of the quotes in the book says Basis of loyalty is a common purpose and not economic dependency. A lot of people I know believe in this. When you unite with an organization which is after the same problem as you, it’s a match made in heaven.

The book talks about Passion, the passion about doing good, making a dent in the universe, but sometimes you realize Universe doesn’t give a damn .

One of the most amazing analogies, is when the book compares a structure of an organization with web architecture which is end to end and not center to end. Where there is no central point of control but there should be a central point of co-ordination. The organization is lead by leaders it selects, where Meritocracy is the idea behind every decision.

The other idea that was completely new to me was the difference between Crowd-sourcing and Open-sourcing.To be honest I had not thought open source to be a business model until the recent past. The thing with the wisdom of the crowd is that it works amazingly well when the work can be easily disagregated and individuals can work in relative isolation. I love the point in the book that says members of the organization should be inspired by the leader and not motivated. Motivation is something they already have and that is the reason they are joining your organization. I love this idea a lot because I have seen people complaining about their employees not being motivated enough. I think that this (lack of inspired leadership) is a reason.

“Great companies don’t hire skilled people and motivate them, they hire already motivated people and inspire them.” – Simon Sinek

I really enjoyed the way the power of purpose is laid out in the book. The other idea was the idea of Meritocracy.  I think of  merit as having an amazing idea and idea being the sole reason for doing a certain action. Better ideas win, they are questioned and deliberated upon and that is how innovation happens in the organization. People debate over it, question it, trash it. People just don’t settle for something to avoid conflict. That very same complacency however is what has creeped into organizations where people don’t debate ideas just to avoid conflict so that everyone remains happy. It was so amazing to read stories where someone thought out of the box and wanted to bring in a new way of doing things and how he convinced everyone that this is the right way of doing things, we ought to give it a try.

This book pushes back on the belief in hierarchy and brings to limelight lateral structure, letting people know that the conventional ways of running an organization might have to change, upgrade as it were, to a newer version.

I got a lot of amazing ideas and to be honest I got to know how a person in an organization should be treated. I was awestruck with the insights in the book. Wish someday I could mould an organization in this way. Theories are always romantic, hope the execution and implementation is beautiful as well.

Design Pattern: Singleton

“Beauty!”, when I see some really amazing code that is my first reaction, but what makes a piece of code beautiful? Is it neatly named variables? Is it the uniform indentation?

Well the answer is yes but there is something a little more than these factors and that is an elegant  solution to the problem. When I say elegant solution what is that I am talking about ? What makes a solution elegant? It is the way you approach a problem.

Design Patterns in the programming world adds to the beauty of the solution, it sometimes feels that it is the missing piece of the puzzle. And the solution so magically fits to solve the problem. The various patterns that I came across are Singleton, Mixin, Pub-Sub etc. The way I approached it and studied them is a little different, design patterns are actually tailored way to react to a given situation.

Let me elaborate on that now suppose there is an emergency and somebody got hurt, what is the first thought that comes to your mind ? It is to handle it using First Aid, this is actually a catered thought which has been imbibed in us from ages and people have design First Aid boxes in such a way that it has all the first come fixes for all the emergencies.

For me I see Design Pattern in the same manner it has gone through the test of time and proved to be the best way to solve a specific type of problem.  It is like a ready made template but you should be aware enough to know the problem and to know the pattern that solves that problem. 

I have read about a lot of design patterns but to be very frank I have seldom seen one being applied in the code-base that I have came across, this could be because I have not appreciated it much and also because I was not able to observe the pattern. It was very recently when I was working with Gautham Sir I began to appreciate the beauty of it. We were writing a utility in jnaapti using EcmaScript 6. He made me feel to appreciate the beauty of it and taught me how to implement it as well.

Let us break it down more and see the type of problems in which Singleton design pattern can be used.

What is Singleton design pattern?

A Singleton design pattern puts a restriction of returning the same object irrespective of how many times the class is being instantiated. This makes sure that whatever is the state of object that state is preserved. Don’t be overwhelmed if you are not able to understand it now it will make more sense once you see the code.

The benefit you get is having a kind of a global store where you can put in data and retrieve it when you desire to.

Lets us make it more clear imagine there is a class Library now through out the life cycle of the software what we want is there should be only one Library object and when ever I get this object I should be able to add and delete books from the library hence modifying the library now when I do this the library object anywhere being use should get this information.

Lets chalk out some code and try to understand it, I have 3 files Library.js, Customer.js and LibraryPlayGround.js.  The content of those file are very straight forward.

es6-12
Library.js

Now we need customers or readers for simplifying things i have only included on one method that is return books.

es6-2
Customer.js

Once all this is done we need a playground where we can see things happening and experiment with it.

es6-3
LibraryPlaygroud.js

Now if you see the code farhaan object has tried to access the same Library object that is being exported. No matter what it well return the same instance which has been instantiated in the beginning of the lifecycle of the software. This is how I tried implementing Singleton .

I have used ECMAScript here to demonstrate that concept and to implement it, I am a learner so there could have been certain things I wouldn’t have made clear, you can leave a comment regarding the same, if you have something to add I would love to know.

Till then Happy Hacking

The A/V guy’s take on PyCon Pune

The A/V guy’s take on PyCon Pune

“This is crazy!”, that was my reaction at some point in PyCon Pune. This is one of my first conference where I participated in a lot of things starting from the website to audio/video and of course being the speaker. I saw a lot of aspects of how a conference works and where what can go wrong. I met some amazing people, people who impacted my life , people who I will never forget. I received so much of love and affection that I can never express in words.  So before writing anything else I want to thank each and everyone of you , “Thank you!”.

My experience or association started the time when the PyCon Pune was being conceived Sayan asked me if I could volunteer for Droidcon so that I can learn how to handle A/V for PP,  and our friends at HasGeek were generous enough to let me do that. The experience at Droidcon was crazy, I met a lot of people and made crazy lot of friends. Basically me and Haseeb were volunteering to learn the A/V stuff and Karthik was patient enough to walk us through the whole complex set up, to be very honest I didn’t get the whole picture till now but I some how able to manage. I learned a thing or two about  manning the camera and how much work actually goes to record a conference.

Since I was anyhow going to the conference I thought why not to apply for a talk but somehow I knew I wasn’t going to make it reason being the talks got rejected in a lot of other conferences 😛 . But anyhow being my stubborn self I don’t give up on rejection I gathered all the courage and got Vivek involved and we decided to apply for the talk and to my surprise it got in. This was our first conference talk and it was on one of the projects that we really really love, Pagure.

Since these things happened over a large span of time, by the time conference dates came I have nearly got out of touch with the A/V setup I only have vague idea about what is happening. So Sayan who is a one man army stepped in and he assured me that he will help me with getting the setup ready and we turned again to our friends at HasGeek and they were really humble to help us out this time and also help us with the instruments. We literally had a suitcase full of wires in case things go wrong. We spend around 3 days to up skill ourselves to handle the setup but this time the setup was very simple.

After all this happened and Sayan and Chandan took all the instruments to Pune. I arrived at Pune somewhere around two days before the conference the bus that I took from Bangalore to Pune dropped me somewhere near Telegaun which is near to Mumbai than Pune and I somehow managed to get back to Pune and reached Sayan and Chandan’s house. We were bunking together and there were more people about to come. I took some rest and then we were out , first stop was Reserved Bit , oh I can’t forget this place.

It is a perfect place for geeks and I loved every aspect of it. There I met Siddhesh for the first time we have had conversations over IRC though and met Nisha too. Amazing people the whole experience to travel to Reserved Bit and way back was amazing. We went to the venue to checkout where the camera will be and verify various aspects of the venue. After we came back I started working on the setup and man it was very tough and tricky to gather live feed from the camera.

First of all I was little hesitant to use any proprietary software but then I had no option so we somehow found a windows laptop and tried configuring it but almost everytime either we got a “BLUE SCREEN” or “UPDATES” which annoyed me , the sole reason of using windows was because we had a piece of hardware called capture cards, and the driver for which were not available. After long struggle and a lot of digging done by Siddhesh we got driver for Epiphan capture card for Linux and this was around 12 in the night and we all were still there at Reserved Bit. This gave all of us new hope and then it started we kind of got our minimalistic set up and Siddhesh did a “Compiler talk by Angle Fish” , it was a lot of fun by the time we got it working it was somewhere around 4 in the morning. After all this Sayan and Me actually took a walk back home and picked up Subho on the way. The next day CuriousLearner arrived and then Haseeb , Amit and Gaurav.

We were around 10 people squeezed in a single room but without any discomfort we kind of enjoyed our stay with occasional leg pulling to deep intense tech discussion the whole experience was just terrific. Then comes the actual venue setup that was one crazy thing so the video setup was working with Linux , we had Epiphan capture card working on Kernel version below 4.9 and OBS studio as a recording software. I actually spent a good number of hours to install OBS and downgrading kernel to 4.6 so that Epiphan driver works on at least 6 laptops. When we tried the setup on site and it broke because we didn’t take into account the audio from the mic. All of us were stuck in a state of panic then we realized that we have a mixer with us, but its power cord was left at Reserved Bit . By this time this setup kind of became our conference hack and we wanted it to work so badly. We actually ran back to Reserved Bit spent sometime there since we had some work and then quickly came back to the venue, connected the mixer and after few trial and run it worked.

“YES IT WORKED ” our efforts paid off, we recorded the whole conference using this setup, some of the recordings were a little glitchy and one other hack that we added was we weren’t recording the slides from speaker’s laptop we were doing it manually on our laptops. That means one copy of slide was being played on our laptops and we were recording it accordingly.

Apart from this experience I actually got the opportunity to meet all the keynote speaker the first so I met Nick, Honza, Terri,  John, Steven and Praveen. This was another experience in itself to know them and talk to the Rockstars of the FOSS WORLD.

As a speaker Kushal introduced me as the Speaker who is also the Cameraman for the event and that was may be the first time in a tech conference. Vivek and I have been collaborating over the talk for a long time and we figured out the order in which we need to speak and we spoke accordingly we kind of covered all the things that we wanted to and got a great response from the audience. I attended most of the talks since I was The A/V GUY but I had a huge help from rtnpro he was always there humble and ready to help.

The conference came to an end where Nisha told all the people about the effort that was put in from every person and specially Sayan. After this we had two days of devsprint where we had amazing projects, Vivek and I were mentoring for Pagure and we got a lot of new contributors and quite a number of PRs ( 13 to be precise ), the devsprint was a run away success.

I also got chance to interact with mbuf and man I saw him smile and crack jokes for the first time and it was crazy fun ,  I think it was the dinner after the last day of the conference. One of the most amazing experience was to talk to Haris and yes his name is Haris not Harish. The whole experience was so lovely that I don’t think that it can be better than this.

PS: We fixed my Macbook too

PPS: Video of our talk at PyCon Pune

Hacking on Pagure CI

Hacking on Pagure CI

“Ahaa!” I got a lot of ahaa moments when I was hacking on Pagure CI ,  Pagure CI’s initial draft was laid by lsedlar and I have blogged about it followed by me and Pingou. Pingou has done really amazing work with the flow and refactoring of code to making beautiful api calls.

I had great time hacking around it and got a bunch of learning. Few of the learning are :

  1. Try to do the minimal work in setting up the development environment mock everything that is available for testing.
  2. Think deeply about something when your mentor points it to you.

So the issue I was working on is a long pending one the issue was to attach build ID to all the Jenkins build Pagure was getting . Reason why attaching build id’s are necessary is to distinguish between different builds and to make the link to Jenkins a bit more specific for example if a build fail which was that build.

The first mistake I did was setting up Jenkins on my machine I had it previously but since my machine went under a kernel panic I lost all data related to Jenkins , now Fedora 25 has some packaging issue when installing  Jenkins directly. But anyhow from Jenkins site I got a way to set it up and it worked for me. In the mean while Pingou was pointing it out that I actually don’t need Jenkins instance but I was not able to get him on that and I really feel bad about it.

After setting up Jenkins the other task for me was to configure it , which was really easy because I have done it before and also because it was well documented. For setting up the documentation is fine but for hacking on the CI you need a little less work.

Step 1

Set up REDIS on your machine , you can do that with installing redis using sudo dnf install redis and enable the service using sudo systemctl enable redis and then start the service using sudo systemctl start redis. Along with this you need to add config for redis in default_config.py or which ever config file you are giving to the server using --config. The configuration are well documented in pagure.cfg.sample.

Step 2

Now, copy the pagure-ci-server from pagure-ci directory into the parent directory. Now once you have done that , this step is necessary because this is the service that run for pagure-ci. Now you just have to run pagure-ci-server by python pagure-ci-server.py. Once this started your service will be up and running.

Step 3

Now you just fire up your instance and make a project , have two branches and open a PR form once branch to other, if you get some authentication error that is most probably because you not done the right permission for users to use Jenkins, this is not recommended but you can entirely turn off the security of Jenkins just because you are testing something.

If you have done everything correct you will see the Jenkins flag being attached to the Pull Request.

VERY IMPORTANT NOTE:

All this could be saved if I have just used python-jenkins to fetch a job from Fedora Jenkins instance and send it as a flag to my PR. Thank you Pingou for telling me this hack.

Happy Hacking!