Url Shortner in Golang

FeaturedUrl Shortner in Golang

TLDR; Trying to learn new things I tried writing a URL shortner called shorty. This is a first draft and I am trying to approach it from first principle basis. Trying to break down everything to the simplest component.

I decided to write my own URL shortner and the reason for doing that was to dive a little more into golang and to learn more about systems. I have planned to not only document my learning but also find and point our different ways in which this application can be made scalable, resilient and robust.

A high level idea is to write a server which takes the big url and return me a short url for the same. I have one more requirement where I do want to provide a slug i.e a custom short url path for the same. So for some links like https://play.google.com/store/apps/details?id=me.farhaan.bubblefeed, I want to have a url like url.farhaan.me/linktray which is easy to remember and distribute.

The way I am thinking to implement this is by having two components, I want a CLI interface which talks to my Server. I don’t want a fancy UI for now because I want it to be exclusively be used through terminal. A Client-Server architecture, where my CLI client sends a request to the server with a URL and an optional slug. If a slug is present URL will have that slug in it and if it doesn’t it generates a random string and make the URL small. If you see from a higher level it’s not just a URL shortner but also a URL tagger.

The way a simple url shortner works:

Flow Diagram

A client makes a request to make a given URL short, server takes the URL and stores it to the database, server then generates a random string and maps the URL to the string and returns a URL like url.farhaan.me/<randomstring>.

Now when a client requests to url.farhaan.me/<randomstring>, it goest to the same server, it searches the original URL and redirects the request to a different website.

The slug implementation part is very straightforward, where given a word, I might have to search the database and if it is already present we raise an error but if it isn’t we add it in the database and return back the URL.

One optimization, since it’s just me who is going to use this, I can optimize my database to see if the long URL already exists and if it does then no need to create a new entry. But this should only happen in case of random string and not in case of slugs. Also this is a trade off between reducing the redundancy and latency of a request.

But when it comes to generating a random string, things get a tiny bit complicated. This generation of random strings, decides how many URLs you can store. There are various hashing algorithms that I can use to generate a string I can use md5, base10 or base64. I also need to make sure that it gives a unique hash and not repeated ones.

Unique hash can be maintained using a counter, the count either can be supplied from a different service which can help us to scale the system better or it can be internally generated, I have used database record number for the same.

If you look at this on a system design front. We are using the same Server to take the request and generate the URL and to redirect the request. This can be separated into two services where one service is required to generate the URL and the other just to redirect the URL. This way we increase the availability of the system. If one of the service goes down the other will still function.

The next step is to write and integrate a CLI system to talk to the server and fetch the URL. A client that can be used for an end user. I am also planning to integrate a caching mechanism in this but not something out of the shelf rather write a simple caching system with some cache eviction policy and use it.

Till then I will be waiting for the feedback. Happy Hacking.

I now have a Patreon open so that you folks can support me to do this stuff for longer time and sustain myself too. So feel free to subscribe to me and help me keeping doing this with added benefits.

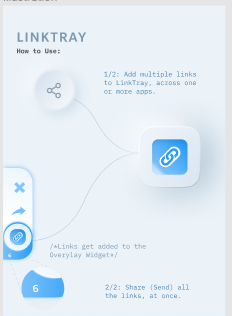
Link Tray

FeaturedLink Tray

TLDR; Link Tray is a utility we recently wrote to curate links from different places and share it with your friends. The blogpost has technical details and probably some productivity tips.

Link Bubble got my total attention when I got to know about it, I felt it’s a very novel idea, it helps to save time and helps you to curate the websites you visited. So on the whole, and believe me I am downplaying it when I say Link Bubble does two things:

  1. Saves time by pre-opening the pages
  2. Helps you to keep a track of pages you want to visit

It’s a better tab management system, what I felt weird was building a whole browser to do that. Obviously, I am being extremely naive when I am saying it because I don’t know what it takes to build a utility like that.

Now, since they discontinued it for a while and I never got a chance to use it. I thought let me try building something very similar, but my use case was totally different. Generally when I go through blogs or articles, I open the links mentioned in a different tab to come back to them later. This has back bitten me a lot of time because I just get lost in so many links.

I thought if there is a utility which could just capture the links on the fly and then I could quickly go through them looking at the title, it might ease out my job. I bounced off the same idea across to Abhishek and we ended up prototyping LinkTray.

Our first design was highly inspired by facebook messenger but instead of chatheads we have links opened. If you think about it the idea feels very beautiful but the design is “highly” not scalable. For example if you have as many as 10 links opened we had trouble in finding our links of interest which was a beautiful design problems we faced.

We quickly went to the whiteboard and put up a list of requirements, first principles; The ask was simple:

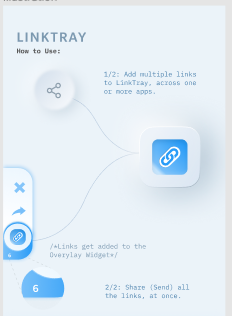
  1. To share multiple links with multiple people with least transitions
  2. To be able to see what you are sharing
  3. To be able to curate links (add/remove/open links)

We took inspiration from an actual Drawer where we flick out a bunch of links and go through them. In a serendipitous moment the design came to us and that’s how link tray looks like the way it looks now.

Link Tray

Link Tray was a technical challenge as well. There is a plethora of things I learnt about the Android ecosystem and application development that I knew existed but never ventured into exploring it.

Link Tray is written in Java, and I was using a very loosely maintained library to get the overlay activity to work. Yes, the floating activity or application that we see is called an overlay activity, this allows the application to be opened over an already running application.

The library that I was using doesn’t have support for Android O and above. To figure that out it took me a few nights 😞 , also because I was hacking on the project during nights 😛 . After reading a lot of GitHub issues I figured out the problem and put in the support for the required operating system.

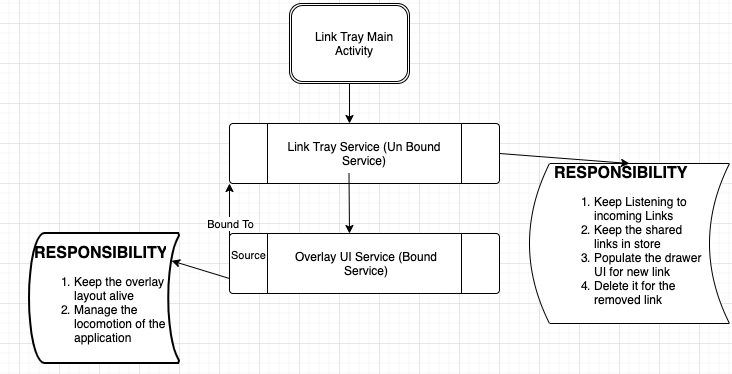
One of the really exciting features that I explored about Android is Services. I think I might have read most of the blogs out there and all the documentation available and I know that I still don't know enough. I was able to pick enough pointers to make my utility to work.

Just like Uncle Bob says make it work and then make it better. There was a persistent problem, the service needs to keep running in the background for it to work. This was not a functional issue but it was a performance issue for sure and our user of version 1.0 did have a problem with it. People got mislead because there was constant notification that LinkTray is running and it was annoying. This looked like a simple problem on the face but was a monster in the depth.

Architecture of Link Tray

The solution to the problem was simple stop the service when the tray is closed, and start the service when the link is shared back to link tray. Tried, the service did stop but when a new link was shared the application kept crashing. Later I figured out the bound service that is started by the library I am using is setting a bound flag to True but when they are trying to reset this flag , they were doing at the wrong place, this prompted me to write this StackOverflow answer to help people understand the lifecycle of service. Finally after a lot of logs and debugging session I found the issue and fixed it. It was one of the most exciting moment and it help me learn a lot of key concepts.

The other key learning, I got while developing Link Tray was about multi threading, what we are doing here is when a link is shared to link tray, we need the title of the page if it has and favicon for the website. Initially I was doing this on the main UI thread which is not only an anti-pattern but also a usability hazard. It was a network call which blocks the application till it was completed, I learnt how to make a network call on a different thread, and keep the application smooth.

Initially approach was to get a webview to work and we were literally opening the links in a browser and getting the title and favicon out, this was a very heavy process. Because we were literally spawning a browser to get information about links, in the initial design it made sense because we were giving an option to consume the links. Over time our design improved and we came to a point where we don’t give the option to consume but to curate. Hence we opted for web scraping, I used custom headers so that we don’t get caught by robot.txt. And after so much of effort it got to a place where it is stable and it is performing great.

It did take quite some time to reach a point where it is right now, it is full functional and stable. Do give it a go if you haven’t, you can shoot any queries to me.

Link to Link Tray: https://play.google.com/store/apps/details?id=me.farhaan.bubblefeed

Happy Hacking!

Debugging React Native

FeaturedDebugging React Native

Recently I have been trying to dabble with mobile application development. I wanted to do something on a cross platform domain, so mostly I am being lazy where I wanted to write the application once and make it work for both iOS and Android. I had a choice to choose between Flutter which is a comparatively new framework and React Native which has been here for a while. I ended up choosing React Native and thanks to Geeky Ants for Native Base the development became really easy.

The way I am approaching developing my application is, by a Divide and Conquer strategy, where I have divide the UI part of the application into different component and I am developing one component at a time. I am using StoryBook for achieving the same. This is a beautiful utility which you should check out. Here we can visualise each small component and see how it will render.

While developing this application I was constantly facing the issue of asking myself , “Did this function got called?” or “What is the value of this variable here?”. So going back to my older self I would have put a print statement or as in JavaScript put a console.log on it.(Read it like Beyoncé‘s put a ring on it.)

Having done that for sometime, I asked myself; Is there a better way to this . And the answer is “YES!”, there is always a better way we just need to find out. Now enters the hero of our story, “Debugger” there are various operations that I can perform like to put up break points – conditional and non conditional and analyse our code.

Let me quickly walk you through this, so VS Code has a react native plugin that has to be configured, to use in our project. Once that is done we are almost ready to use it. I faced few issues while getting it to work initially and so I thought having some pointers upfront might ease out the development for other people.

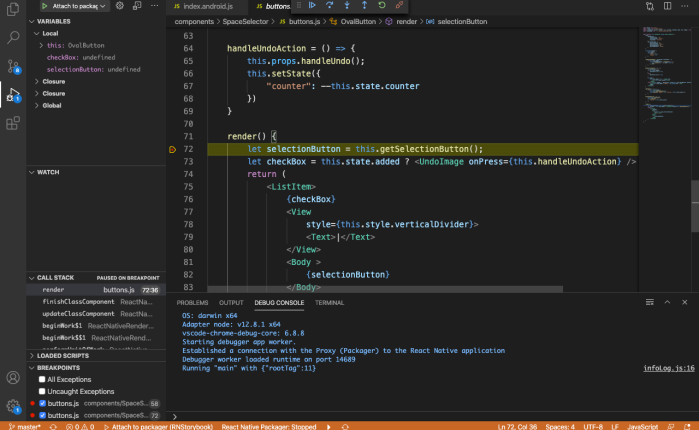
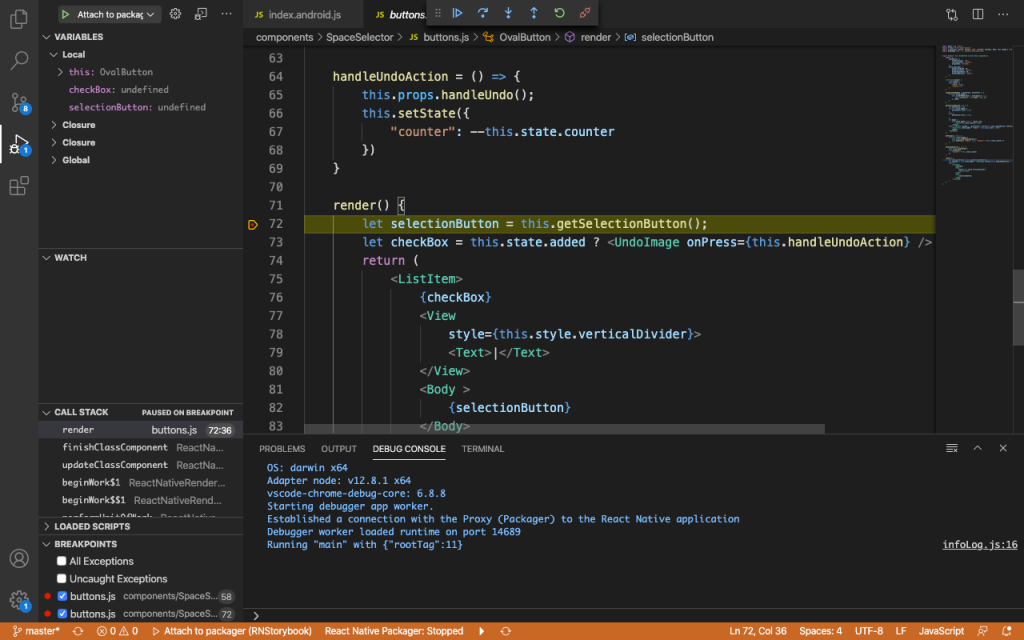
Before I go into deeper details, just a preview of how a debugger looks like on ReactNative with VS Code.

Debugger In Action

So let’s get to the meat of it and how to get it to work. First and foremost we need to download and install React Native Tools from VS Code extensions.

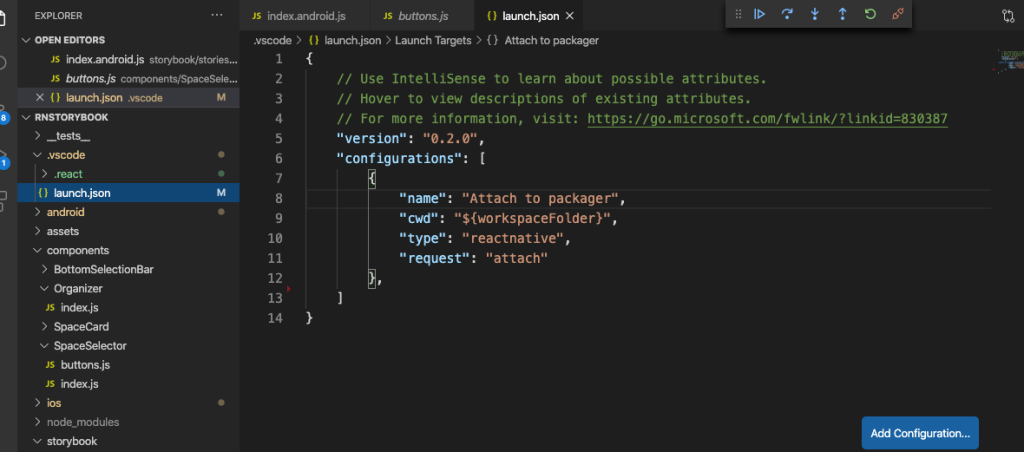
Once that is done we are are good to go, on the side bar you can see that there is a Debug button , when you click on it, VS code opens up a configuration file.

launch.json

There are various options you can play around but the one that worked the best for me was Attach to packager. Once the configuration is in, then we need start the packager, mostly it is done by npm start, but VS Code also provide an option in the action bar at the bottom.

Action Bar

Once the the packager is started we need to start our debugger, click on the Debug button on the sidebar and click on the Attach to packager icon. This will start your debugger from VS Code. Till now your action bar should be of blue color showing that the debugger has started but not active yet.

Then on the device where you are deploying the application you need to enable Debug Js and Vola! your debugger will be active. Debugger has helped me a lot. I could inspect each variable and see at what point of time what values it holds.

Or I can step into debugger and trace the flow of the control statement. I can even put a conditional break point and see when a condition is met or not.

Debuggers has helped me a lot to make my development go faster, hope this blog helps the readers too.

Happy Hacking!

Android Services

FeaturedAndroid Services

From past few days I have been dwelling in android to make a utility, an application that I can be used when I am reading and article or when I am researching about something.

The premise lies around on the fact that the application itself doesn’t have a screen but what it plays around is on background activity. So it silently keeps on running and when an interrupt comes it performs an action.

Since I am not very well versed with how to make an android of such kind, I searched and found out about the component which does this and it’s called a Service. This is very similar to the concept of linux services or daemons.

The application I am designing is basically a combination of overlay activity and background services. Hence I wouldn’t say that there will be no user interaction at all but it will be really minimal and user doesn’t have a inherent knowledge about the service.

So it was time to do some more reading on android services.

Service is an application component that can perform long-running operations in the background, and it doesn’t provide a user interface. Another application component can start a service, and it continues to run in the background even if the user switches to another application.

Documentation

This was something that I really wanted, now there are a few caveats to this blogpost that is my understanding and knowledge about android application development. So I would tell you take things with a pinch of salt and let me know if there is anything wrong with my understanding.

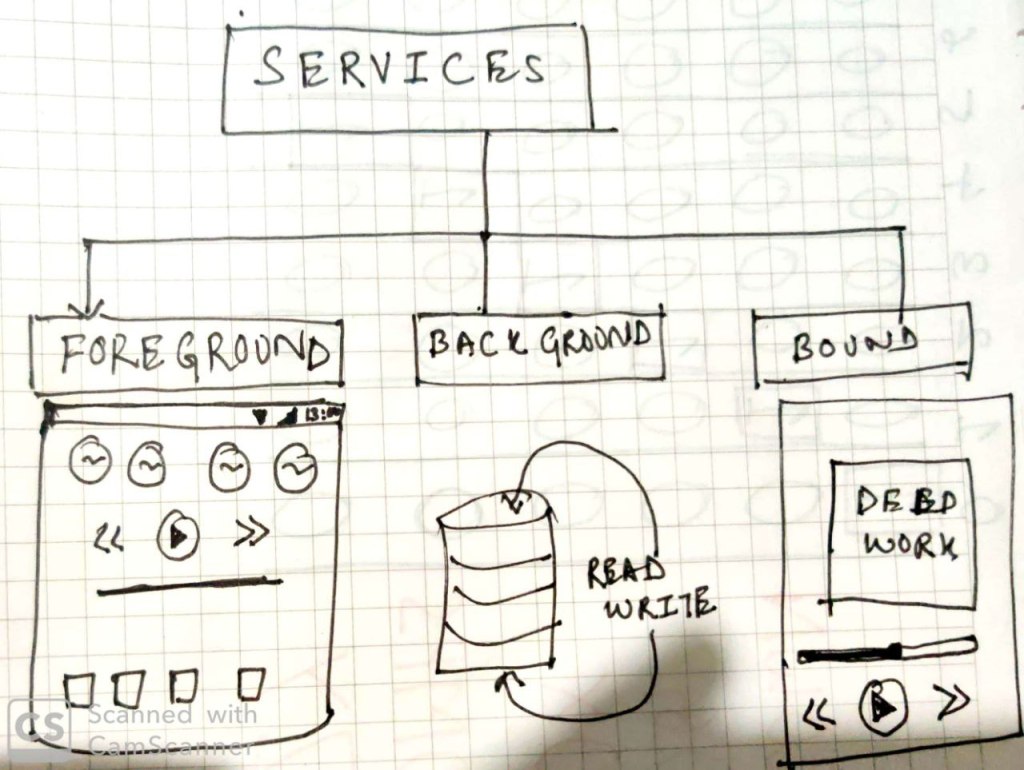
When I read more about services I got to know there are 3 kinds of them:

Foreground

This is how you see spotify music work, even when the application is not in the display you can change songs through notification and there is one level of user interaction involved with this.

Background

Services with which user don’t want to know about or interact, like updating a database, fetching some resources etc.

Bound

Bound services are the one which are attach to the user activity, the quickest example I can give is music player, you don’t want the music to stop when you switch application and in the mean time you want to control the music when you switch back to the application.

Mostly people use services so that all the heavy lifting is done in the background. I had a unique case what I wanted is a service that keeps running and observing, when something is changed or when it is poked then react to it.

If you have seen the design of facebook messenger, the chat heads comes to life only when you have a message, this was somewhat the use case.

The biggest thing that I learnt is android doesn’t allow you run a background service without notifying the user. This is a new addition the happened after Android Oreo.

Implementation

There are two kinds of implementation that android provides,

The former as it’s name suggest is used to spawn service and is attached to the main thread. While IntentSrvice is something more peculiar where you can divide the work and do it without actually make your application wait for something. For example suppose you are playing a game and you are in middle of level 1, now an IntentService can be used to spawn to download and keep all the data required for level 2 without affecting your game play.

Another amazing thing about services is that, it is a singleton, that means however time you are going to start a service, you are not going to interact with too many objects, it’s the same class which you are going to talk to.

Conclusion

These are few of the learning that I got about services in android, I didn’t put much code here because most of them is available in the references. I enjoyed my time learning about how services are designed and how they are manged internally in android. Let me know what you think about it.

Till then, Keep Hacking!

References:

https://www.hellsoft.se/how-to-service-on-android—part-2/

https://proandroiddev.com/deep-dive-into-android-services-4830b8c9a09

https://robertohuertas.com/2019/06/29/android_foreground_services/

https://medium.com/@harunwangereka/android-background-services-b5aac6be3f04

Word Embeddings Simplified

FeaturedWord Embeddings Simplified

Recently I have been dwelling with a lot of NLP problems and jargons. The more I read about it the more I find it intriguing and beautiful of how we humans try to transfer this knowledge of a language to machines.

How much ever we try because of our laid back nature we try to use already existing knowledge or existing materials to be used to make machines understand a given language.

But machines as we know it can only understand digits or lets be more precise binary(0s and 1s). When I first laid my hands on NLP this was my first question, how does a machine understand that something is a word or sentence or a character.

I am still a learner in this field(and life 😝) but what I could understand information that we are going to use has to be converted into binary or some kind of a numerical representation for a machine to understand.

There are various ways to “encode” this information into numerical form and that is what is called word embeddings.

What are word embeddings?

Word embedding is the collective name for a set of language modeling and feature learning techniques in natural language processing (NLP) where words or phrases from the vocabulary are mapped to vectors of real numbers. Conceptually it involves a mathematical embedding from a space with many dimensions per word to a continuous vector space with a much lower dimension.

Wikipedia

In short word embedding is a way to convert a textual information into numerical form so that it can help us analyse it.

Analysis like similarity between words or sentences, understand the context in which a phrase or word is being spoken etc.

How are they formed?

Lets try to convert a given sentence into a numerical form:

A quick brown fox jumps over the lazy dog

How do we convert the above sentence into a numerical form such that our machine or even we can perform operations on it. And its hard to figure out the mathematics of language but we can always try.

So lets try, what we can do is, get all unique words and sort the words in the sentences and then makes a list of them. But then how do we get a numerical representation for it. It’s time for us to visit our long lost friend – Matrix.

Let’s get the words in proper order i.e unique and sorted

Now we will try to convert these words into numerical form using some matrix concepts(mostly representation) so that we can make a word look different from another word.

If you see there are totally 10 words and so we took 10 blocks to represent it. In a more mathematical term each representation is called a vector and the dimension of this vector is 1 x 10. So each word in this universe can be represented by a vector of that dimension and we can now carry operations on it to get our desired result.

Few prominent operations are how similar are two vectors or how different are two vectors. We can dive into that later.

Now the method that we just followed is a very brute force way of doing this and is officially called as One-Hot Encoding or Count Vectorizing.

Why we do this?

Now the way we encoded above words can be really useless because it’s just a representation and it doesn’t have any other idea so we don’t know how two words are related or are they morphologically similar etc.

The prime reason we want to have encoding is to find similar words, gauge the context of the topics etc.

There are various other techniques which actually produce intelligent embeddings that has an idea about what is going on.

As Hunter puts it

When constructing a word embedding space, typically the goal is to capture some sort of relationship in that space, be it meaning, morphology, context, or some other kind of relationship

and a lot of other embeddings like Elmo, USE etc. does a good job at that.

As we go ahead and explore more embeddings you will see it goes on becoming more complex. There are layers of training models introduced etc.

We even have sentence embeddings which are way different from just word embeddings.

Conclusion

This was just a tip of the iceberg or may be not even that but I thought it will be helpful for someone who is starting their exploration because it took time for me to get around this concept. Thanks a lot for reading.

Happy Hacking!

References:

http://hunterheidenreich.com/blog/intro-to-word-embeddings/

https://towardsdatascience.com/word-representation-in-natural-language-processing-part-ii-1aee2094e08a

https://towardsdatascience.com/document-embedding-techniques-fed3e7a6a25d?gi=7c5fcb5695df

Template Method Design Pattern

Template Method Design Pattern

This is a continuation of the design pattern series.

I had blogged about Singleton once, when I was using it very frequently. This blog post is about the use of the Template Design Pattern. So let’s discuss the pattern and then we can dive into the code and its implementation and see a couple of use cases.

The Template Method Design Pattern is a actually a pattern to follow when there are a series of steps, which need to be followed in a particular order. Well, the next question that arises is, “Isn’t every program a series of steps that has to be followed in a particular order?”

The answer is Yes!

This pattern diverges when it becomes a series of functions that has to be executed in the given order. As the name suggests it is a Template Method Design pattern, with stress on the word method, because that is what makes it a different ball game all together.

Let’s understand this with an example of Eating in a Buffet. Most of us have follow a set of similar specific steps, when eating at a Buffet. We all go for the starters first, followed by main course and then finally, dessert. (Unless it is Barbeque Nation then it’s starters, starters and starters :))

So this is kind of a template for everyone Starters --> Main course --> Desserts.

Keep in mind that content in each category can be different depending on the person but the order doesn’t change which gives a way to have a template in the code. The primary use of any design pattern is to reduce duplicate code or solve a specific problem. Here this concept solves the problem of code duplication.

The concept of Template Method Design Pattern depends on, or rather  is very tightly coupled with Abstract Classes. Abstract Classes themselves are a template for derived classes to follow but Template Design Pattern takes it one notch higher, where you have a template in a template. Here’s an example of a BuffetHogger class.

from abc import ABC, abstractmethod

class BuffetHogger(ABC):

    @abstractmethod
    def starter_hogging(self):
        pass

    @abstractmethod
    def main_course_hogging(self):
        pass

    @abstractmethod
    def dessert_hogging(self):
        pass

    def template_hogging(self):
        self.starter_hogging()
        self.main_course_hogging()
        self.dessert_hogging()

So if you see here the starter_hogging, main_course_hogging and dessert_hogging are abstract class that means base class has to implement it while template_hogging uses these methods and will be same for all base class.

Let’s have a Farhaan class who is a BuffetHogger and see how it goes.

class Farhaan(BuffetHogger):
    def starter_hogging(self):
        print("Eat Chicken Tikka")
        print("Eat Kalmi Kebab")

    def __call__(self):
        self.template_hogging()

    def main_course_hogging(self):
        print("Eat Biryani")

    def dessert_hogging(self):
        print("Eat Phirni")
Now you can spawn as many  BuffetHogger  classes as you want, and they’ll all have the same way of hogging. That’s how we solve the problem of code duplication
Hope this post inspires you to use this pattern in your code too.
Happy Hacking!

Benchmarking MongoDB in a container

The database layer for an application is one of the most crucial part because believe it or not it effects the performance of your application, now with micro-services getting the attention I was just wondering if having a database container will make a difference.

As we have popularly seen most of the containers used are stateless containers that means that they don’t retain the data they generate but there is a way to have stateful containers and that is by mounting a host volume in the container. Having said this there could be an issue with the latency in the database request, I wanted to measure how much will this latency be and what difference will it make if the installation is done natively verses if the installation is done in a container.

I am going to run a simple benchmarking scheme I will make 200 insert request that is write request keeping all other factors constant and will plot the time taken for these request and see what comes out of it.

I borrowed a quick script to do the same from this blog. The script is simple it just uses pymongo the python MongoDB driver to connect to the database and make 200 entries in a random database.


import time
import pymongo
m = pymongo.MongoClient()

doc = {'a': 1, 'b': 'hat'}

i = 0

while (i < 200):

start = time.time()
m.tests.insertTest.insert(doc, manipulate=False, w=1)
end = time.time()

executionTime = (end - start) * 1000 # Convert to ms

print executionTime

i = i + 1

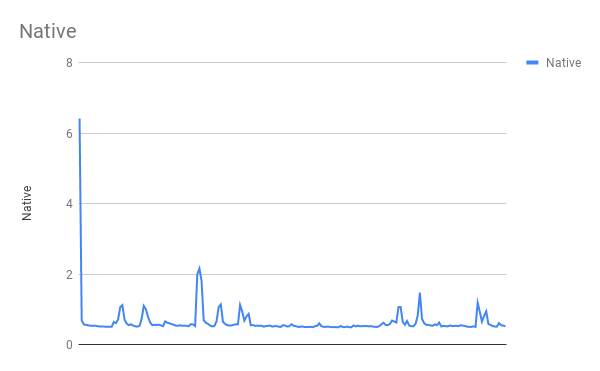
So I went to install MongoDB natively first I ran the above script twice and took the second result into consideration. Once I did that I plotted the graph with value against the number of request. The first request takes time because it requires to make connection and all the over head and the plot I got looked like this.


Native
MongoDb Native Time taken in ms v/s Number of request

The graph shows that the first request took about 6 ms but the consecutive requests took way lesser time.

Now it was time I try the same to do it in a container so I did a docker pull mongo and then I mounted a local volume in the container and started the container by

docker run --name some-mongo -v /Users/farhaanbukhsh/mongo-bench/db:/data/db -d mongo

This mounts the volume I specified to /data/db in the container then I did a docker cp of the script and installed the dependencies and ran the script again twice so that file creation doesn’t manipulate the time.

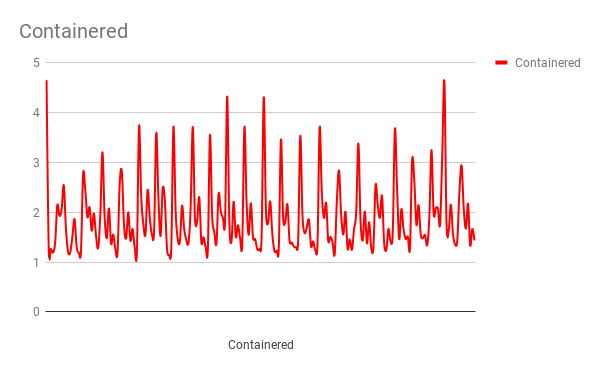
To my surprise the first request took about 4ms but subsequent requests took a lot of time.

Containered
MongoDB running in a container(Time in ms v/s Number of Requests)


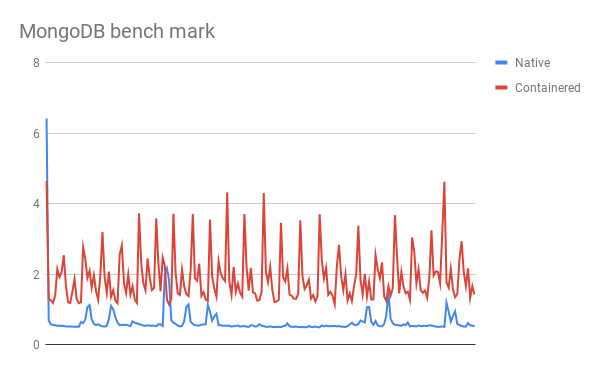
And when I compared them the time time difference for each write or the latency for each write operation was ​considerable.

MongoDB bench mark
Comparison between Native and Containered MongoDB

I had this thought that there will be difference in time and performance but never thought that it would be this huge, now I am wondering what is the solution to this performance issue, can we reach a point where the containered performance will be as good as native.

Let me know what do you think about it.

Happy Hacking!

Debugging Python with Visual Studio Code

Debugging Python with Visual Studio Code

I have started using Visual Studio Code, and to be honest, I feel it’s one of the best IDEs in the market. I’m still a Vimmer; given a chance I still use VIM for small edits or carrying out nifty text transformations. After Vim, the next tool that has really impressed me is VSC; the innovations the team are doing, the utility that it provides is almost a super power.

This post is regarding one of the utilities that I have been using very recently. This is a skill that I have been trying to harness for a long time. For every person who writes code there comes a time where they need to figure out what is going wrong;  there’s a need to debug the code.
The most prominent and well used debugging tools are print statements. To be really honest, it doesn’t feel (to me) quite right to use print statements to debug my code, but that’s the most handy way to figure out the flow and inspect each variable. I’ve tried a lot of debuggers and it alway feels like extra effort to actually take a step up and use them. This could be one of the reasons I might have not used them very intensively. (Although I have used pudb extensively.)

But, with VS Code, the way debugger is integrated in really well. It feels very natural to use it. Recently when I was working on few scripts and was trying to debug them, I went on exploring a little more with the python debugger in VS Code.

So I have this script and I want to run the debugger or it. You hit ctrl + alt + p, this opens the the command drop down, just type debug and you will see the option,  Debug and start debugging.


Screenshot 2018-06-24 22.45.31


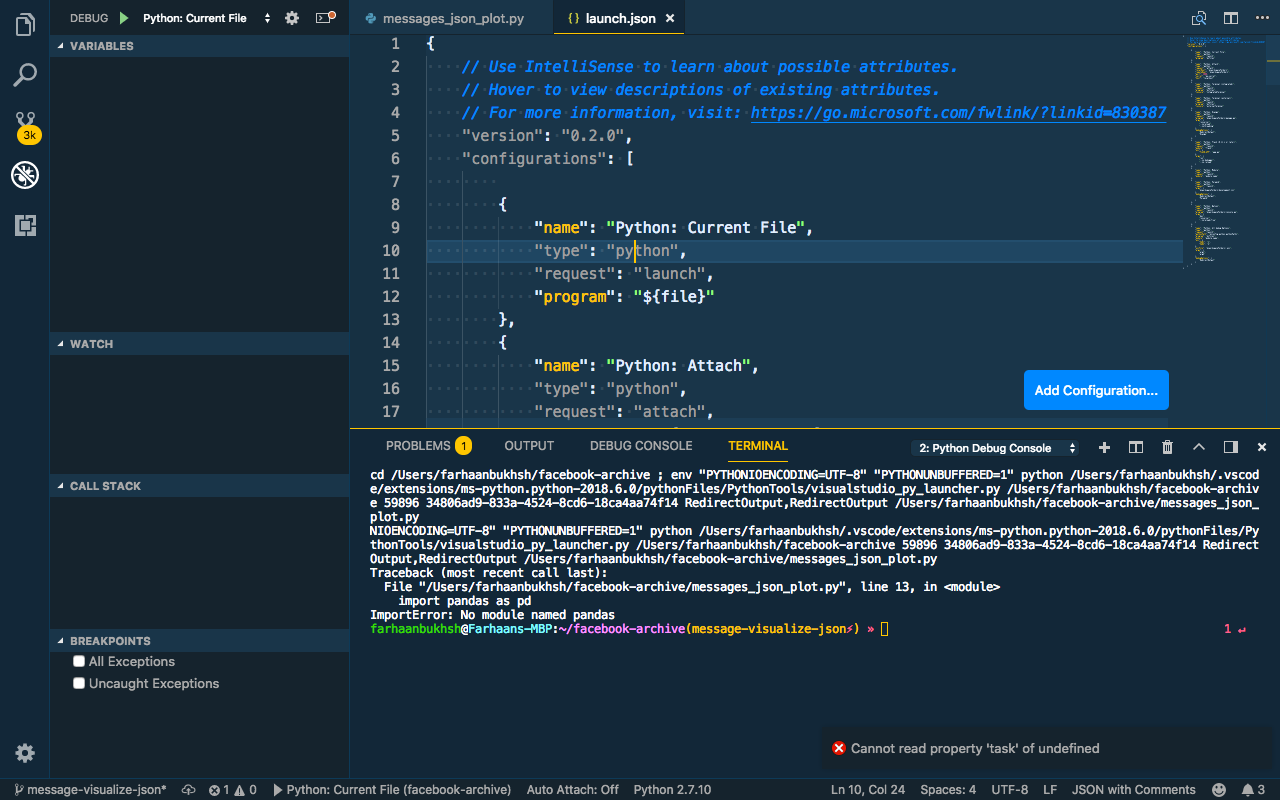
This actually creates a launch.json file in your project. You can put all your configuration in here. We’ll edit the config file as we go; since it is not a Django or Flask project we will use the current file configuration. That looks like this:

{

"name":"Python: Current File",

"type":"python",

"request":"launch",

"program":"${file}"

}

You can set the pythonPath here if you are using a virtual environment, name sets the name of the configuration, type is the type of file, that is being debugged it, and  request can be used to debug it in different ways. Let’s make our configs more customised,
{

"name":"Facebook Achieve Debug",

"type":"python",

"request":"launch",

"program": "${flle}"

}
Screenshot 2018-06-25 00.23.42
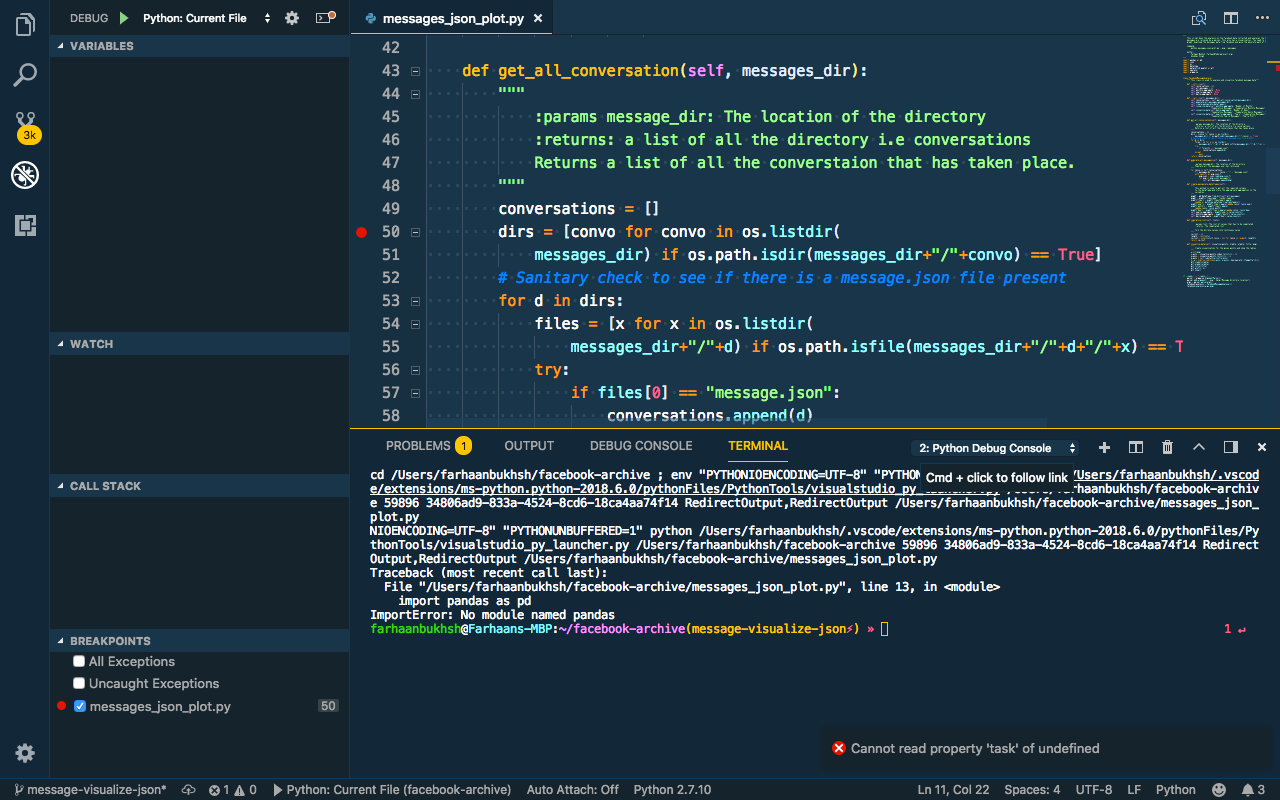
If you observe there’s a red dot at line 50.  That is called the breakpoint and that is where the program will stop and you will be able to observe variables and see the flow of the program.
Let’s see what the screen looks like when you do that,
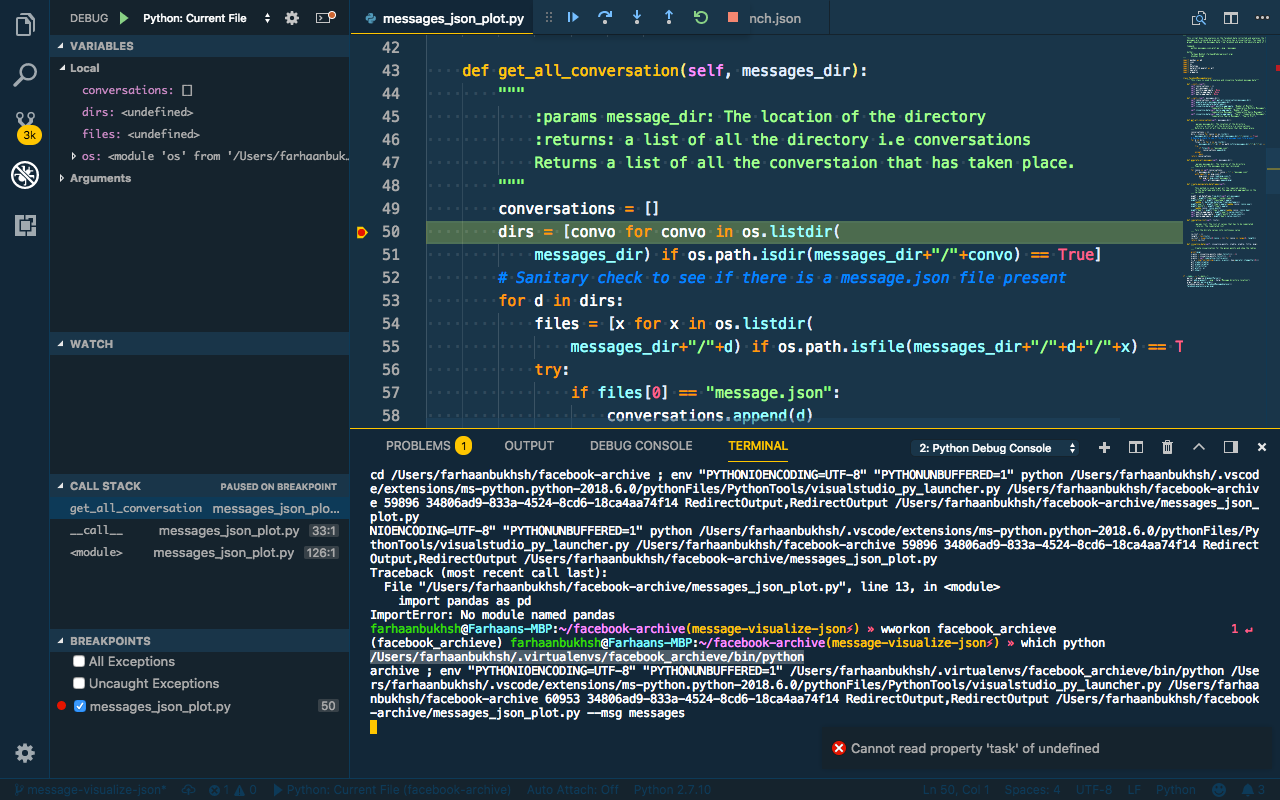
Screenshot 2018-06-25 00.34.34
This is the editor in full flow, you could see the stack that is being followed, you can also go and inspect each variable.
With the debug console (lower right pane) you can even run some code that you want to run or to inspect the same. Now, let us look at the final config and see what is going on.

{

 "name":"Python: Current File",

 "type":"python",

 "request":"launch",

"program":"${file}",

 "pythonPath":"/Users/farhaanbukhsh/.virtualenvs/facebook_archieve/bin/python",

 "args":[

    "--msg",

    "messages"

   ]

}

If you observe I have the pythonPath set to my ​virtualenv and I have one more argument which is args which is the command-line  argument that has to be passed to the script.
I still use print statement sometimes but I have made it  a sure point to start using the debugger as early as possible because, believe it or not, this definitely helps a lot and saves time.

Home Theatre!

Due to a lot of turmoils in my life in the recent past, I had to shift with a friend. Abhinav has been an old friend and college mate, we have hacked on a lot of software and hardware projects together but this one is on of the coolest hack of all time and since we are flatmates now it solved a lot of issues. We also had his brother Abhishek so the hack became more fun.

The whole idea began with the thoughts of making the old laptops which we have to be used as servers, we just thought what can we do to make the best of the machines we have. He has already done few set ups but then we landed up on doing a htpc, it stands for Home Theatre PC or media centre, basically a one stop shop for all the need, movies, tv shows and music. And we came up with a nice arrangement which requires few things, the hardware we have:

  1. Dell Studio 1558
  2. Raspberry Pi 3
  3. And a TV to watch these on 😉

When we started configuring this setup we had a desktop version of Ubuntu 18.04 installed but we figured out that this was slowing down the machine so we switched to Ubuntu Server edition. This was some learning because I have never installed any server version of operating system. I use to wonder always what kind of interface will these versions give. Well without any doubt it just has a command-line utility for every thing, from partition to network connection.

Once the server was installed we just had to turn that server into a machine which can support our needs, basically installed few packages.

We landed up on something called as Atomic Toolkit. A big shoutout for the team to develop this amazing installed which has a ncurses like interface and can run anywhere. Using this toolkit we kind of installed and configured CouchePotato, Emby and Headphones.

This slideshow requires JavaScript.

This was more than enough we could automate a lot of things in our life with this kind of set up, from Silicon Valley to Mr. Robot. CouchePotato help us to get the best quality of videos and Emby gives us a nice dashboard to show all the content we have.

I don’t use Headphones much because I love another Music Application but then Headphones being a one stop shop is not wrong too. All this was done on the Dell Studio Machine we had, also we stuck a static IP on it so to know which IP to hit.

Our sever was up, running and configured. Now, we needed a client to listen to this server we kind of have a TV but that TV is not smart enough so we used a Raspberry Pi 3 and attached it to the TV using the HDMI port.

We installed OSMC on the Raspberry Pi and configured it to use Emby and listen to the Emby server once we booted it up it was very straight forward. This made our TV look good and also a little smart and it opened our ways for 1000s of movies, music and podcast. Although I don’t know if setting up this system was more fun or watching those movies will be.


Writing Chuck – Joke As A Service

Writing Chuck – Joke As A Service

Recently I really got interested to learn Go, and to be honest I found it to be a beautiful language. I personally feel that it has that performance boost factor from a static language background and easy prototype and get things done philosophy from dynamic language background.

The real inspiration to learn Go was these amazing number of tools written and the ease with which these tools perform although they seem to be quite heavy. One of the good examples is Docker. So I thought I would write some utility for fun, I have been using fortune, this is a Linux utility which gives random quotes from a database. I thought let me write something similar but let me do something with jokes, keeping this mind I was actually searching for what can I do and I landed up on jokes about Chuck Norris or as we say it facts about him. I landed up on chucknorris.io they have an API which can return different jokes about Chuck, and there it was my opportunity to put something up and I chose Go for it.

JSON PARSING

The initial version of the utility which I put together was way simple, it use to make a GET request stream the data in put in the given format and display the joke. But even with this implementation I learnt a lot of things, the most prominent one was how a variable is exported in Go i.e how can it be made available across scope and how to parse a JSON from a received response to store the beneficial information in a variable.

// Chucknorris is the struct used to unmarshal the JSON response from the URL
type Chucknorris struct {
Category []string `json:"category"`
IconURL string `json:"icon_url"`
ID string `json:"id"`
URL string `json:"url"`
Value string `json:"value"`
}
/* getJokes takes the API url as the parameter and fetch jokes from it,
* here we have assumed it to be of ChuckNorris type
*/
//TODO: Remove the dependency on the hardcoded struct
func getJokes(URL string) (string, error) {
req, err := http.NewRequest("GET", URL, nil)
if err != nil {
return "", fmt.Errorf("No request formed %v", err)
}
client := &http.Client{}
resp, err := client.Do(req)
if err != nil {
return "", fmt.Errorf("No response: %v", err)
}
defer resp.Body.Close()
respData, err := ioutil.ReadAll(resp.Body)
if err != nil {
return "", fmt.Errorf("Read error")
}
var joke Chucknorris
if err = json.Unmarshal(respData, &joke); err != nil {
return "", fmt.Errorf("Error in unmarsheling, %v", err)
}
return joke.Value, nil
}
view raw initial.go hosted with ❤ by GitHub

Now the mistake I was doing with the above code is I was declaring the fields of the struct with a small letters this caused a problem because although the value get stored in the struct I can’t use them outside the function I have declared it in. I actually took a while to figure it out and it was really nice to actually learn about this. I actually learnt about how to make a GET request and parse the JSON and use the given values.

Let’s walk through the code, the initial part is a struct and I have few fields inside it, the Category field is a slice of string, which can have as many elements as it receives the interesting part is the way you can specify the key from the received JSON how the value of received JSON is stored in the variable or the field of the struct. You can see the json:"categories" that is the way to do it.

With the rest of the code if you see I am making a GET request to the given URL and if the it returns a response it will be res and if it returns an error it will be handled by err. The key part here is how marshaling and unmarshaling of JSON takes place.

This is basically folding and un-folding JSON once that is done and the values are stored to retrieve the value we just use a dot notation and done. There is one more interesting part if you see we passed &joke which if you have a C background you will realize is passing the memory address, pass by reference, is what you are looking at.

This was working good and I was quite happy with it but there were two problems I faced:

  1. The response use to take a while to return the jokes
  2. It doesn’t work without internet

So I showed it to Sayan and he suggested why not to build a joke caching mechanism this would solve both the problems since jokes will be stored internally on the file system it will take less time to fetch and there is no dependency on the internet except the time you are caching jokes.

So I designed the utility in a way that you can cache as may number of jokes as you want you just have to run chuck --index=10 this will cache 10 jokes for you and will store it in a Database. Then from those jokes a random joke is selected and is shown to you.

I learnt to use flag in go and also how to integrate a sqlite3 database in the utility, the best learning was handling files, so my logic was anytime you are caching you should have a fresh set of jokes so when you cache I completely delete the database and create a new one for the user. To do this I need to check of the Database is already existing and if it is then remove it. I landed up looking for the answer on how to do that in Go, there are a bunch of inbuilt APIs which help you to do that but they were misleading for me. There is os.Stat, os.IsExist and os.IsNotExist. What I understood is os.Stat will give me the status of the file, while the other two can tell me if the file exists or it doesn’t, to my surprise things don’t work like that. The IsExist and IsNotExist are two different error wrapper and guess what not of IsExist is not IsNotExist, good luck wrapping your head around it. I eventually ended up answering this on stackoverflow.

After a few iteration of using it on my own and fixing few bugs the utility is ready except the fact that it is missing test cases which I will soon integrate, but this has helped me learn Go a lot and I have something fun to suggest to people. Well, I am open to contribution and hope you will enjoy this utility as much as I do.

Here is a link to chuck!

Give it a try and till then Happy Hacking and Write in GO! 

Featured Image: https://gopherize.me/