This is a continuation of the design pattern series.
I had blogged about Singleton once, when I was using it very frequently. This blog post is about the use of the Template Design Pattern. So let’s discuss the pattern and then we can dive into the code and its implementation and see a couple of use cases.
The Template Method Design Pattern is a actually a pattern to follow when there are a series of steps, which need to be followed in a particular order. Well, the next question that arises is, “Isn’t every program a series of steps that has to be followed in a particular order?”
The answer is Yes!
This pattern diverges when it becomes a series of functions that has to be executed in the given order. As the name suggests it is a Template Method Design pattern, with stress on the word method, because that is what makes it a different ball game all together.
Let’s understand this with an example of Eating in a Buffet. Most of us have follow a set of similar specific steps, when eating at a Buffet. We all go for the starters first, followed by main course and then finally, dessert. (Unless it is Barbeque Nation then it’s starters, starters and starters :))
So this is kind of a template for everyone Starters --> Main course --> Desserts.
Keep in mind that content in each category can be different depending on the person but the order doesn’t change which gives a way to have a template in the code. The primary use of any design pattern is to reduce duplicate code or solve a specific problem. Here this concept solves the problem of code duplication.
The concept of Template Method Design Pattern depends on, or rather is very tightly coupled with Abstract Classes.Abstract Classes themselves are a template for derived classes to follow but Template Design Pattern takes it one notch higher, where you have a template in a template. Here’s an example of a BuffetHogger class.
So if you see here the starter_hogging, main_course_hogging and dessert_hogging are abstract class that means base class has to implement it while template_hogging uses these methods and will be same for all base class.
Let’s have a Farhaan class who is a BuffetHogger and see how it goes.
Now you can spawn as many BuffetHogger classes as you want, and they’ll all have the same way of hogging. That’s how we solve the problem of code duplication
Hope this post inspires you to use this pattern in your code too.
The database layer for an application is one of the most crucial part because believe it or not it effects the performance of your application, now with micro-services getting the attention I was just wondering if having a database container will make a difference.
As we have popularly seen most of the containers used are stateless containers that means that they don’t retain the data they generate but there is a way to have stateful containers and that is by mounting a host volume in the container. Having said this there could be an issue with the latency in the database request, I wanted to measure how much will this latency be and what difference will it make if the installation is done natively verses if the installation is done in a container.
I am going to run a simple benchmarking scheme I will make 200 insert request that is write request keeping all other factors constant and will plot the time taken for these request and see what comes out of it.
I borrowed a quick script to do the same from this blog. The script is simple it just uses pymongo the python MongoDB driver to connect to the database and make 200 entries in a random database.
import time
import pymongo
m = pymongo.MongoClient()

doc = {'a': 1, 'b': 'hat'}

i = 0

while (i < 200):

start = time.time()
m.tests.insertTest.insert(doc, manipulate=False, w=1)
end = time.time()

executionTime = (end - start) * 1000 # Convert to ms

print executionTime

i = i + 1
So I went to install MongoDB natively first I ran the above script twice and took the second result into consideration. Once I did that I plotted the graph with value against the number of request. The first request takes time because it requires to make connection and all the over head and the plot I got looked like this.
MongoDb Native Time taken in ms v/s Number of request
The graph shows that the first request took about 6 ms but the consecutive requests took way lesser time.
Now it was time I try the same to do it in a container so I did a docker pull mongo and then I mounted a local volume in the container and started the container by
docker run --name some-mongo -v /Users/farhaanbukhsh/mongo-bench/db:/data/db -d mongo
This mounts the volume I specified to /data/db in the container then I did a docker cp of the script and installed the dependencies and ran the script again twice so that file creation doesn’t manipulate the time.
To my surprise the first request took about 4ms but subsequent requests took a lot of time.
MongoDB running in a container(Time in ms v/s Number of Requests)
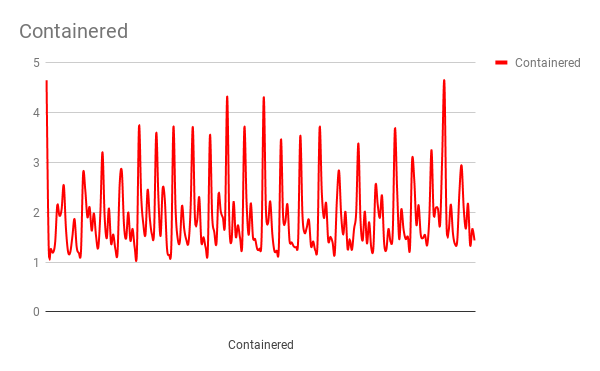
And when I compared them the time time difference for each write or the latency for each write operation was considerable.
Comparison between Native and Containered MongoDB
I had this thought that there will be difference in time and performance but never thought that it would be this huge, now I am wondering what is the solution to this performance issue, can we reach a point where the containered performance will be as good as native.
I have started using Visual Studio Code, and to be honest, I feel it’s one of the best IDEs in the market. I’m still a Vimmer; given a chance I still use VIM for small edits or carrying out nifty text transformations. After Vim, the next tool that has really impressed me is VSC; the innovations the team are doing, the utility that it provides is almost a super power.
This post is regarding one of the utilities that I have been using very recently. This is a skill that I have been trying to harness for a long time. For every person who writes code there comes a time where they need to figure out what is going wrong; there’s a need to debug the code.
The most prominent and well used debugging tools are print statements. To be really honest, it doesn’t feel (to me) quite right to use print statements to debug my code, but that’s the most handy way to figure out the flow and inspect each variable. I’ve tried a lot of debuggers and it alway feels like extra effort to actually take a step up and use them. This could be one of the reasons I might have not used them very intensively. (Although I have used pudb extensively.)
But, with VS Code, the way debugger is integrated in really well. It feels very natural to use it. Recently when I was working on few scripts and was trying to debug them, I went on exploring a little more with the python debugger in VS Code.
So I have this script and I want to run the debugger or it. You hit ctrl + alt + p, this opens the the command drop down, just type debug and you will see the option, Debug and start debugging.
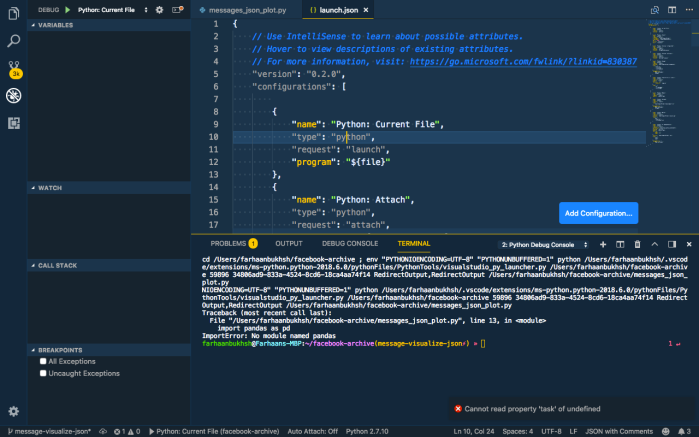
This actually creates a launch.json file in your project. You can put all your configuration in here. We’ll edit the config file as we go; since it is not a Django or Flask project we will use the current file configuration. That looks like this:
{

"name":"Python: Current File",

"type":"python",

"request":"launch",

"program":"${file}"

}
You can set the pythonPath here if you are using a virtual environment, name sets the name of the configuration, type is the type of file, that is being debugged it, and request can be used to debug it in different ways. Let’s make our configs more customised,
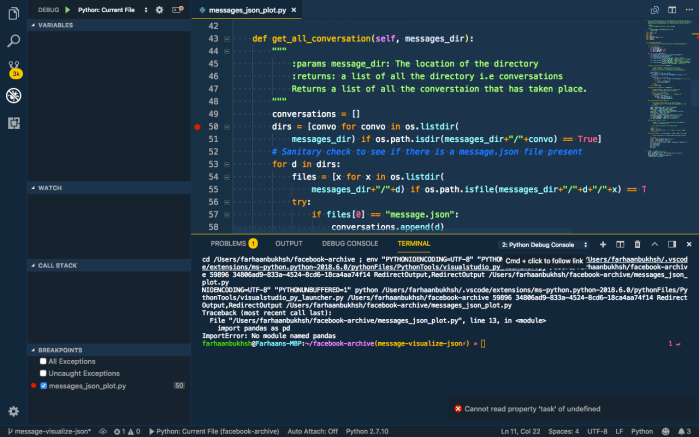
If you observe there’s a red dot at line 50. That is called the breakpoint and that is where the program will stop and you will be able to observe variables and see the flow of the program.
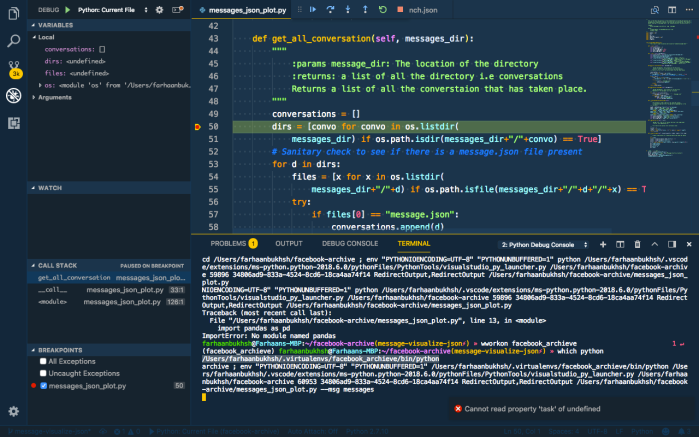
Let’s see what the screen looks like when you do that,
This is the editor in full flow, you could see the stack that is being followed, you can also go and inspect each variable.
With the debug console (lower right pane) you can even run some code that you want to run or to inspect the same. Now, let us look at the final config and see what is going on.
If you observe I have the pythonPath set to my virtualenv and I have one more argument which is args which is the command-line argument that has to be passed to the script.
I still use print statement sometimes but I have made it a sure point to start using the debugger as early as possible because, believe it or not, this definitely helps a lot and saves time.
Due to a lot of turmoils in my life in the recent past, I had to shift with a friend. Abhinav has been an old friend and college mate, we have hacked on a lot of software and hardware projects together but this one is on of the coolest hack of all time and since we are flatmates now it solved a lot of issues. We also had his brother Abhishek so the hack became more fun.
The whole idea began with the thoughts of making the old laptops which we have to be used as servers, we just thought what can we do to make the best of the machines we have. He has already done few set ups but then we landed up on doing a htpc, it stands for Home Theatre PC or media centre, basically a one stop shop for all the need, movies, tv shows and music. And we came up with a nice arrangement which requires few things, the hardware we have:
Dell Studio 1558
Raspberry Pi 3
And a TV to watch these on 😉
When we started configuring this setup we had a desktop version of Ubuntu 18.04 installed but we figured out that this was slowing down the machine so we switched to Ubuntu Server edition. This was some learning because I have never installed any server version of operating system. I use to wonder always what kind of interface will these versions give. Well without any doubt it just has a command-line utility for every thing, from partition to network connection.
Once the server was installed we just had to turn that server into a machine which can support our needs, basically installed few packages.
We landed up on something called as Atomic Toolkit. A big shoutout for the team to develop this amazing installed which has a ncurses like interface and can run anywhere. Using this toolkit we kind of installed and configured CouchePotato, Emby and Headphones.
This slideshow requires JavaScript.
This was more than enough we could automate a lot of things in our life with this kind of set up, from Silicon Valley to Mr. Robot. CouchePotato help us to get the best quality of videos and Emby gives us a nice dashboard to show all the content we have.
I don’t use Headphones much because I love another Music Application but then Headphones being a one stop shop is not wrong too. All this was done on the Dell Studio Machine we had, also we stuck a static IP on it so to know which IP to hit.
Our sever was up, running and configured. Now, we needed a client to listen to this server we kind of have a TV but that TV is not smart enough so we used a Raspberry Pi 3 and attached it to the TV using the HDMI port.
We installed OSMC on the Raspberry Pi and configured it to use Emby and listen to the Emby server once we booted it up it was very straight forward. This made our TV look good and also a little smart and it opened our ways for 1000s of movies, music and podcast. Although I don’t know if setting up this system was more fun or watching those movies will be.
“This is crazy!”, that was my reaction at some point in PyCon Pune. This is one of my first conference where I participated in a lot of things starting from the website to audio/video and of course being the speaker. I saw a lot of aspects of how a conference works and where what can go wrong. I met some amazing people, people who impacted my life , people who I will never forget. I received so much of love and affection that I can never express in words. So before writing anything else I want to thank each and everyone of you , “Thank you!”.
My experience or association started the time when the PyCon Pune was being conceived Sayan asked me if I could volunteer for Droidcon so that I can learn how to handle A/V for PP, and our friends at HasGeek were generous enough to let me do that. The experience at Droidcon was crazy, I met a lot of people and made crazy lot of friends. Basically me and Haseeb were volunteering to learn the A/V stuff and Karthik was patient enough to walk us through the whole complex set up, to be very honest I didn’t get the whole picture till now but I some how able to manage. I learned a thing or two about manning the camera and how much work actually goes to record a conference.
Since I was anyhow going to the conference I thought why not to apply for a talk but somehow I knew I wasn’t going to make it reason being the talks got rejected in a lot of other conferences 😛 . But anyhow being my stubborn self I don’t give up on rejection I gathered all the courage and got Vivek involved and we decided to apply for the talk and to my surprise it got in. This was our first conference talk and it was on one of the projects that we really really love, Pagure.
Since these things happened over a large span of time, by the time conference dates came I have nearly got out of touch with the A/V setup I only have vague idea about what is happening. So Sayan who is a one man army stepped in and he assured me that he will help me with getting the setup ready and we turned again to our friends at HasGeek and they were really humble to help us out this time and also help us with the instruments. We literally had a suitcase full of wires in case things go wrong. We spend around 3 days to up skill ourselves to handle the setup but this time the setup was very simple.
After all this happened and Sayan and Chandan took all the instruments to Pune. I arrived at Pune somewhere around two days before the conference the bus that I took from Bangalore to Pune dropped me somewhere near Telegaun which is near to Mumbai than Pune and I somehow managed to get back to Pune and reached Sayan and Chandan’s house. We were bunking together and there were more people about to come. I took some rest and then we were out , first stop was Reserved Bit , oh I can’t forget this place.
It is a perfect place for geeks and I loved every aspect of it. There I met Siddhesh for the first time we have had conversations over IRC though and met Nisha too. Amazing people the whole experience to travel to Reserved Bit and way back was amazing. We went to the venue to checkout where the camera will be and verify various aspects of the venue. After we came back I started working on the setup and man it was very tough and tricky to gather live feed from the camera.
First of all I was little hesitant to use any proprietary software but then I had no option so we somehow found a windows laptop and tried configuring it but almost everytime either we got a “BLUE SCREEN” or “UPDATES” which annoyed me , the sole reason of using windows was because we had a piece of hardware called capture cards, and the driver for which were not available. After long struggle and a lot of digging done by Siddhesh we got driver for Epiphan capture card for Linux and this was around 12 in the night and we all were still there at Reserved Bit. This gave all of us new hope and then it started we kind of got our minimalistic set up and Siddhesh did a “Compiler talk by Angle Fish” , it was a lot of fun by the time we got it working it was somewhere around 4 in the morning. After all this Sayan and Me actually took a walk back home and picked up Subho on the way. The next day CuriousLearner arrived and then Haseeb , Amit and Gaurav.
We were around 10 people squeezed in a single room but without any discomfort we kind of enjoyed our stay with occasional leg pulling to deep intense tech discussion the whole experience was just terrific. Then comes the actual venue setup that was one crazy thing so the video setup was working with Linux , we had Epiphan capture card working on Kernel version below 4.9 and OBS studio as a recording software. I actually spent a good number of hours to install OBS and downgrading kernel to 4.6 so that Epiphan driver works on at least 6 laptops. When we tried the setup on site and it broke because we didn’t take into account the audio from the mic. All of us were stuck in a state of panic then we realized that we have a mixer with us, but its power cord was left at Reserved Bit . By this time this setup kind of became our conference hack and we wanted it to work so badly. We actually ran back to Reserved Bit spent sometime there since we had some work and then quickly came back to the venue, connected the mixer and after few trial and run it worked.
“YES IT WORKED ” our efforts paid off, we recorded the whole conference using this setup, some of the recordings were a little glitchy and one other hack that we added was we weren’t recording the slides from speaker’s laptop we were doing it manually on our laptops. That means one copy of slide was being played on our laptops and we were recording it accordingly.
Apart from this experience I actually got the opportunity to meet all the keynote speaker the first so I met Nick, Honza, Terri, John, Steven and Praveen. This was another experience in itself to know them and talk to the Rockstars of the FOSS WORLD.
As a speaker Kushal introduced me as the Speaker who is also the Cameraman for the event and that was may be the first time in a tech conference. Vivek and I have been collaborating over the talk for a long time and we figured out the order in which we need to speak and we spoke accordingly we kind of covered all the things that we wanted to and got a great response from the audience. I attended most of the talks since I was The A/V GUY but I had a huge help from rtnpro he was always there humble and ready to help.
The conference came to an end where Nisha told all the people about the effort that was put in from every person and specially Sayan. After this we had two days of devsprint where we had amazing projects, Vivek and I were mentoring for Pagure and we got a lot of new contributors and quite a number of PRs ( 13 to be precise ), the devsprint was a run away success.
I also got chance to interact with mbuf and man I saw him smile and crack jokes for the first time and it was crazy fun , I think it was the dinner after the last day of the conference. One of the most amazing experience was to talk to Haris and yes his name is Haris not Harish. The whole experience was so lovely that I don’t think that it can be better than this.
“Ahaa!” I got a lot of ahaa moments when I was hacking on Pagure CI , Pagure CI’s initial draft was laid by lsedlar and I have blogged about it followed by me and Pingou. Pingou has done really amazing work with the flow and refactoring of code to making beautiful api calls.
I had great time hacking around it and got a bunch of learning. Few of the learning are :
Try to do the minimal work in setting up the development environment mock everything that is available for testing.
Think deeply about something when your mentor points it to you.
So the issue I was working on is a long pending one the issue was to attach build ID to all the Jenkins build Pagure was getting . Reason why attaching build id’s are necessary is to distinguish between different builds and to make the link to Jenkins a bit more specific for example if a build fail which was that build.
The first mistake I did was setting up Jenkins on my machine I had it previously but since my machine went under a kernel panic I lost all data related to Jenkins , now Fedora 25 has some packaging issue when installing Jenkins directly. But anyhow from Jenkins site I got a way to set it up and it worked for me. In the mean while Pingou was pointing it out that I actually don’t need Jenkins instance but I was not able to get him on that and I really feel bad about it.
After setting up Jenkins the other task for me was to configure it , which was really easy because I have done it before and also because it was well documented. For setting up the documentation is fine but for hacking on the CI you need a little less work.
Step 1
Set up REDIS on your machine , you can do that with installing redis using sudo dnf install redis and enable the service using sudo systemctl enable redis and then start the service using sudo systemctl start redis. Along with this you need to add config for redis in default_config.py or which ever config file you are giving to the server using --config. The configuration are well documented in pagure.cfg.sample.
Step 2
Now, copy the pagure-ci-server from pagure-ci directory into the parent directory. Now once you have done that , this step is necessary because this is the service that run for pagure-ci. Now you just have to run pagure-ci-server by python pagure-ci-server.py. Once this started your service will be up and running.
Step 3
Now you just fire up your instance and make a project , have two branches and open a PR form once branch to other, if you get some authentication error that is most probably because you not done the right permission for users to use Jenkins, this is not recommended but you can entirely turn off the security of Jenkins just because you are testing something.
If you have done everything correct you will see the Jenkins flag being attached to the Pull Request.
VERY IMPORTANT NOTE:
All this could be saved if I have just used python-jenkins to fetch a job from Fedora Jenkins instance and send it as a flag to my PR. Thank you Pingou for telling me this hack.
“This is awesome!”, this was my first reaction when I boarded my first flight to Delhi. I was having trouble in finding a proper accommodation Kushal, Sayan and Chandan helped me a lot in that part, I finally got honour of bunking with Sayan , Subho and Rtnpro which I will never forget. So, I landed and directly went to JNU convention center. I met the whole Red Hat intern gang . It was fun to meet them all. I had proposed Pagure for Dev Sprint and I pulled in Vivek to do the same.
The dev sprint started and there was no sign of Vivek or Saptak, Saptak is FOSSASIA contributor and Vivek contributes to Pagure with me. Finally it was my turn to talk about Pagure on stage , it was beautiful the experience and the energy. We got a lot of young and new contributors and we tried to guide them and make them send at least one PR. One of them was lucky enough to actually make a PR and it got readily merged.
I met a lot of other contributors and other mentors and each and every project was simply amazing. I wish I could help all of them some day. We also met Paul, who writes code for PyCharm, we had a nice discussion over Vim v/s PyCharm.
Finally the day ended with us Vivek, Sayan , Subho , Saptak and me going out to grab some dinner. I bunked with Sayan and Subho and we hacked all night. I was configuring my Weechat and was trying all the plugins available and trust me there are a lot of them.
Day 1
I was a session chair in one of the lecture room and it was a crazy experience from learning to write a firmware for a drone, using generators to write multi-threaded program and also to work with salt stack. The food was really good but the line for food was equally “pythonic” as the code should be.
There were a lot of stalls put up and I went to all of them and had a chat with them. My favorite one was PyCharm because Paul promised me to teach me some neat tricks to use PyCharm.
The Redhat and Pyladies booth were also there which also were very informative and they were responsible making people aware about certain social issues and getting women in tech.
We had two keynotes on this day one by BG and the other by VanL and trust me both of the keynotes were so amazing the they make you look technology from a different view point altogether.
One of the amazing part of such conferences are Open Space and Lightning talks. There are few open spaces which I attended and I found them really enthralling. I was waiting for the famous Stair case meeting of Dgplug. We met Kushal’s mentor, Sartaj and he gave a deep insight in what and why we should contribute to open source. He basically told us that even if one’s code is not used by anyone he will still be writing code for the love of doing it.
After this we went for Dgplug/Volunteers dinner at BBQ nation, it was an eventful evening 😉 to be modest.
Day 2
The last day of conference I remember myself wondering how a programming language translates into philosophy and how that philosophy unites a diverse nation like India. The feeling was amazing but I could sense the sadness. The sadness of parting from friends who meet once in an year. I could actually now relate all IRC nicks with their faces. It just brings a lot more on the table.
At last we all went to the humdrum of our normal life with the promise to meet again. But I still wonder how a technology bring comradeship between people from all nook and corners of life. How it relates from a school teacher to a product engineer . T his makes me feel that this is more than just a programming language , this is that unique medium that unites people and give them power to make things right.
I have been wondering about writing telegram bots, so while searching about it I landed on this link Python telegram api. This fueled my curiosity to write my first telegram bot. I searched for many ideas and I was too late to implement them because others have already implemented it.
Then while having a conversation we came across the idea of having a lmgtfy bot to answer silly question , then tools met requirements and voila lmgtfyou_bot was born. (Yeah! you got it right, every other name was taken.)
So, yeah you need to install a pip package mentioned in the link above. Before going into details let me discuss something about ‘polling’.
There are two type of models namely polling and observer model. Polling means the function keeps on pinging the application to see if something changed while in observer model it’s like tell me if something changed.
Imagine a very irritating waiter who is disturbing you in every 10s about your order now that is polling while you calling a waiter when you are ready is observer pattern.
Here Telegram api is using a polling pattern to get change in the event , for us it is new messages.Now there is a lot of things that is happening in the code. Let me walk you through it
So let’s see whats going on here. getUpdates() function returns a list of updates which is a composite data containing various metadata about the message like text, username , date etc. Here, update_id is taken from the latest update i.e message hence [-1]. update_id keeps on increasing with every incoming message. We use this to control our script which running in an infinite loop.
 while True:
   fetch_url(bot)
fetch_url is being called infinite number of times which is being controlled by LAST_UPDATE_ID variable.
def fetch_url(bot):
 global LAST_UPDATE_ID

 # Following is a dictionary of commands that the bot can use

 commands = {'/help':"You can add me in any group or text me! I don't have aceess to the group message so you need to call me by my name i.e @lmgtfyou_bot or start your senstence with '/' , I listen to the keyword 'means' ", '/start':'I am always listening to you. Just use magical words'}

 magic_words = ['means','mean','/means','/mean']

 for update in bot.getUpdates(offset=LAST_UPDATE_ID, timeout=10):
     chat_id = update.message.chat_id
     message = update.message.text.encode('utf-8')
     message_list = message.split()

     if(message in commands):
         bot.sendMessage(chat_id=chat_id, text=commands[message])
         LAST_UPDATE_ID = update.update_id + 1

     if ( list_compare(magic_words, message_list)!= -1):
         search = message_list[list_compare(magic_words, message_list)-1]
         url='http://lmgtfy.com/?q='+search
         bot.sendMessage(chat_id=chat_id,text=url)
         LAST_UPDATE_ID = update.update_id + 1
Most of the code is self explaining, but last line of the if block is kind of a base case which is helping to control the actions.
You can host the code on openshift for free, just set up an instance write the code in app-deployment folder and ssh into the instance. Now, in the instance run the script normally and put it in the background.That’s all for this time have a nice hack.
Feel free to fork and contribute to my repo on GitHub.