File Indexing In Golang

File Indexing In Golang

I have been working on a pet project to write a File Indexer, which is a utility that helps me to search a directory for a given word or phrase.

The motivation behind to build this utility was so that we could search the chat log files for dgplug. We have a lot of online classes and guest sessions and at times, we just remember the name or a phrase used in the class, backtracking the files using these phrases aren’t possible as of now. I thought I will give a stab at this issue and since I am trying to learn golang I used it to implement my solution. It took me a span of two weeks where I spent time to upskill certain aspects and also to come up with a clean solution.

Exploration

This started with me exploring similar solutions, because why not? It is always better to improve an existing solution than to write your own. I didn’t find any which suited our need though so I ended up writing my own. The exploration led me to discover a few  libraries that proved useful. I found fulltext and Bleve.

I found bleve to have better documentation and some really beautiful thought behind the library. Really minimal yet effective. At the end of it all, I was sure I was going to use it.

Working On the Solution

After all the exploration I tried to break the problem into smaller pieces and then go about solving each one of them. So the first one was to understand how bleve worked. I found out that bleve creates an index first; for which we need to give it the list of files. The index is basically a map structure behind the scenes, where you give it the id and content to be indexed. So what could be a unique constraint for a file in a filesystem? The path of the file! I used it as the id to my structure and the content of my file as the value.

After figuring this out, I wrote a function which takes the directory as the argument and gives back the path of each file as well as its contents. After a few iterative. improvements it diverged into two functions; one responsible to get the path of all the files and the other to just read the file and get the content out.

func fileNameContentMap() []FileIndexer {
	var ROOTPATH = config.RootDirectory
	var files []string
	var filesIndex FileIndexer
	var fileIndexer []FileIndexer

	err := filepath.Walk(ROOTPATH, func(path string, info os.FileInfo, err error) error {
		if !info.IsDir() {
			files = append(files, path)
		}
		return nil
	})
	checkerr(err)
	for _, filename := range files {
		content := getContent(filename)
		filesIndex = FileIndexer{Filename: filename, FileContent: content}
		fileIndexer = append(fileIndexer, filesIndex)
	}
	return fileIndexer
}

This forms a struct which stores the name of the file and the content of the file. And since I can have many files I need to have a array of said struct. This is how a simple data structure evolves into a complex one.

Now I have the utility of getting all files, getting content of the file and making an index.

This leads us to the next crucial step.

How Do I Search?

Now that I’ve prepped my data the next logical step was to retrieve the searched results. The way we search something is by passing a query so I duck-typed a function which accepts a string and then went on a spree of documentation look up to find out how do I search in bleve. I found a simple implementation which returns the id of the file which is the path and match score.


 func searchResults(indexFilename string, searchWord string) *bleve.SearchResult {
	index, _ := bleve.Open(indexFilename)
	defer index.Close()
	query := bleve.NewQueryStringQuery(searchWord)
	searchRequest := bleve.NewSearchRequest(query)
	searchResult, _ := index.Search(searchRequest)
	return searchResult
}

This function opens the index and search for the term and returns back the information.

Let’s Serve It

After all that is done I need to have a service which does this on demand so I wrote a simple API server which has two endpoints index and search.  The way mux works is you give the endpoint to the handler and the function to be mapped with it. I had to restructure the code in order to make this work. I faced a really crazy bug which when I narrowed it down, came to a point of a memory leak and yes, it was because I left the file read stream open, so remember when you Open always defer Close.

I used Postman to heavily test it and it was returning good responses. A dummy response looks like this:

 [{"index":"irclogs.bleve","id":"logs/some/hey.txt","score":0.6912244671221862,"sort":["_score"]}]

Missing Parts?

The missing part was I didn’t use any dependency manager which Kushal pointed out to me, so I landed up using dep to do this for me. The next one was one of my favourite  problems of the project and that was how to auto-index a file. Suppose my service is running and I added one more file to the directory, then this file’s content wouldn’t come up in the search because the indexer hasn’t run on it yet. This was a fascinating  problem and I tried to approach it from many different angles. First I thought I would re-run the service every time I add a file but that’s not a graceful solution. Then I thought I would write a cron job which would ping /index at regular intervals and yet again that struck me as inelegant. Finally I wondered if I could detect changes in a file. This led me to explore gin, modd and fresh.

Gin was not very compatible with mux so didn’t use it, modd was really nice but I needed to kill the server to restart it since two services cannot run on a single port and every time I kill that service I kill the modd daemon too so that possibility also got ruled out.

Finally the best solution was fresh although I had to write a custom config file to suit the requirement, this approach still has issues with nested repository indexing which I am thinking how to figure out.

What’s Next?

This project is yet to be containerised and there are missing test cases so I would be working on them, as and when I get time.

I have learnt a lot of new things about the filesystem and how it works, because of this project. This little project also helped me appreciate a lot of golang concepts and made me realise the power of static typing.

If you are interested you are welcome to contribute to file-indexer. Feel free to ping me.

Till then, Happy Hacking!


Benchmarking MongoDB in a container

The database layer for an application is one of the most crucial part because believe it or not it effects the performance of your application, now with micro-services getting the attention I was just wondering if having a database container will make a difference.

As we have popularly seen most of the containers used are stateless containers that means that they don’t retain the data they generate but there is a way to have stateful containers and that is by mounting a host volume in the container. Having said this there could be an issue with the latency in the database request, I wanted to measure how much will this latency be and what difference will it make if the installation is done natively verses if the installation is done in a container.

I am going to run a simple benchmarking scheme I will make 200 insert request that is write request keeping all other factors constant and will plot the time taken for these request and see what comes out of it.

I borrowed a quick script to do the same from this blog. The script is simple it just uses pymongo the python MongoDB driver to connect to the database and make 200 entries in a random database.


import time
import pymongo
m = pymongo.MongoClient()

doc = {'a': 1, 'b': 'hat'}

i = 0

while (i < 200):

start = time.time()
m.tests.insertTest.insert(doc, manipulate=False, w=1)
end = time.time()

executionTime = (end - start) * 1000 # Convert to ms

print executionTime

i = i + 1

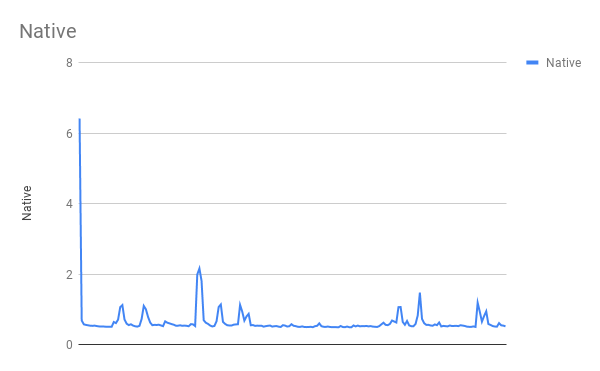
So I went to install MongoDB natively first I ran the above script twice and took the second result into consideration. Once I did that I plotted the graph with value against the number of request. The first request takes time because it requires to make connection and all the over head and the plot I got looked like this.


Native
MongoDb Native Time taken in ms v/s Number of request

The graph shows that the first request took about 6 ms but the consecutive requests took way lesser time.

Now it was time I try the same to do it in a container so I did a docker pull mongo and then I mounted a local volume in the container and started the container by

docker run --name some-mongo -v /Users/farhaanbukhsh/mongo-bench/db:/data/db -d mongo

This mounts the volume I specified to /data/db in the container then I did a docker cp of the script and installed the dependencies and ran the script again twice so that file creation doesn’t manipulate the time.

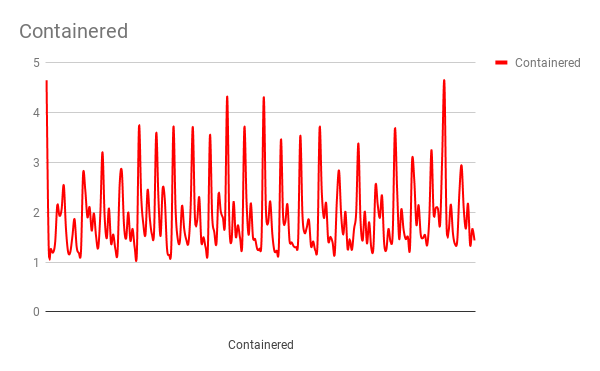
To my surprise the first request took about 4ms but subsequent requests took a lot of time.

Containered
MongoDB running in a container(Time in ms v/s Number of Requests)


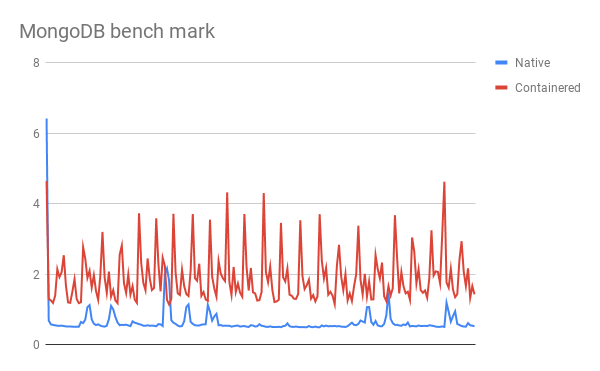
And when I compared them the time time difference for each write or the latency for each write operation was ​considerable.

MongoDB bench mark
Comparison between Native and Containered MongoDB

I had this thought that there will be difference in time and performance but never thought that it would be this huge, now I am wondering what is the solution to this performance issue, can we reach a point where the containered performance will be as good as native.

Let me know what do you think about it.

Happy Hacking!

Dockah! Dockah! Dockah!

Dockah! Dockah! Dockah!

I have been dabbling with docker for quite sometime, to be honest when it was introduced to me I didn’t understand it much but as time passed and I started experimenting with it I got to know the technology better and better. This made me understand various concepts better. I understood virtualization, containerization, sandboxing and got to appreciate how docker solves the problem of works on my machine.

When I started using docker I use to just run few commands and I could get the server running, this I could access through browser that was more than enough for me. When I use to make changes to the code I could see it getting reflected in the way I am running the application and I was a happy man.

This was all abstract thinking and I was not worried about what was going inside the container, it was a black box for me. This went on for a while but it shouldn’t have, I have the right to know things and how they work. So I started exploring about the realm and the more I read about it the more I fell in love with it. I eventually landed up on Jessie’s blog. The amount of things she and Gautham has taught me is crazy. I could never think that docker being a headless server could actually be used to captivate an application in such a way that you decide how much resources should be given to it. We at jnaapti have been working on various other possibilities but that for some other time.

So yeah there is more to just starting the application using docker and get things to work. So let’s try to understand few things with respect to docker, this is purely from my experience and how I understood things. So containers are virtual environments which share some of the resource of your host operating system. Containers are just like Airbnb guest for which the host is the Operating System. Containers are allowed to use the resources only when the user of Operating System gives them permission to use. Now the way I use them is basically in two ways, Stateful containers or Stateless containers, stateful being the one which has some data generated and stored in them while stateless is the one which doesn’t have any dependency on data.

Let me show you one of the use case that I generally use containers for; Now people may disagree and say I am exploiting it or using the power for wrong purpose but to be very frank if it solves my problem why should I care XD. Now, imagine I want to learn to write Go and I don’t want to install it on my system but have an isolated environment for it. There are two ways I can pull a docker image which has Go in it or get a normal image and install go in it. An image here is just like an iso file which is used to help you install an Operating System on your machine. Let’s see what all images I have on my machine,

I would run docker images and the output looks like this:

docker-images
docker-images

This shows that I have a znc image I use it to run a znc bouncer. Let’s try and pull a ubuntu image and install golang in it.  The command goes docker pull ubuntu.

docker-pull
docker-pull

Now we need to run a docker container and get a shell access to the container. For that we run command docker run -it --name="golang" ubuntu:latest /bin/bash

Let’s break it down and see what is going on here, run tells the docker to start the container -it option tells that this is going to be an interactive session and we need to attach a tty to this, --name is the option to give name to the docker container and ubuntu:latest is the name of the image and /bin/bash is the process that needs to be run.

Once you run this command you will that you will get a root prompt something like this:

docker-prompt
docker-prompt


Now you can run any command inside it and you will be totally isolated from your host machine. For installing golang let’s follow these instruction from Digital Ocean. You should ignore the ssh instruction instead run apt update and apt install curl nano. Follow the rest normally and you will see it working like this:

go-docker
go-docker


You can play around with golang in the docker and when you are done you can exit. The docker stays it’s just that you are out of it. You want the shell again you can run,

docker exec -it golang /bin/bash

You will get the shell again, this is what is called stateful container since it will have all the files that you have created. You can go ahead and mount a volume to the container using -v option in the docker run statement, this will act as if you plugged in a pen-drive in the docker storage being a directory you have created on the host machine.

docker exec -it -v /home/fhackdroid/go-data:/go-data golang /bin/bash

This will mount the /home/fhackdroid/go-data to ​/go-data in the docker container.

These are the few ways I use docker in my daily life, if you use it in any other way and you want to share do write it to me I would be more than happy to know.

Happy Hacking Folks!